<?xml version="1.0" encoding="utf-8"?><feed xmlns="http://www.w3.org/2005/Atom" ><generator uri="https://jekyllrb.com/" version="3.9.5">Jekyll</generator><link href="https://dmitryrogozhny.com/feed.xml" rel="self" type="application/atom+xml" /><link href="https://dmitryrogozhny.com/" rel="alternate" type="text/html" /><updated>2024-07-06T12:12:34+00:00</updated><id>https://dmitryrogozhny.com/feed.xml</id><title type="html">Dzmitry Rahozhny (Dmitry Rogozhny)</title><subtitle>Development, Architecture, and Consulting
</subtitle><author><name>Dzmitry Rahozhny (Dmitry Rogozhny)</name></author><entry><title type="html">Controlling SharePoint Framework Package Size</title><link href="https://dmitryrogozhny.com/blog/improving-spfx-size" rel="alternate" type="text/html" title="Controlling SharePoint Framework Package Size" /><published>2019-12-11T12:00:00+00:00</published><updated>2019-12-11T12:00:00+00:00</updated><id>https://dmitryrogozhny.com/blog/improving-spfx-size</id><content type="html" xml:base="https://dmitryrogozhny.com/blog/improving-spfx-size"><![CDATA[<p>It is important to remember about the performance of your SharePoint Framework solutions. Today we’ll look at a demo web part, review its size, and after that we’ll see how this web part can be improved.</p>

<p>I previously wrote about the demo <a href="/blog/video-web-part">video web part</a>. This web part shows a video using a preconfigured Url.</p>
<video autoplay="" loop="" src="/assets/2019/video-web-part.mp4"></video>

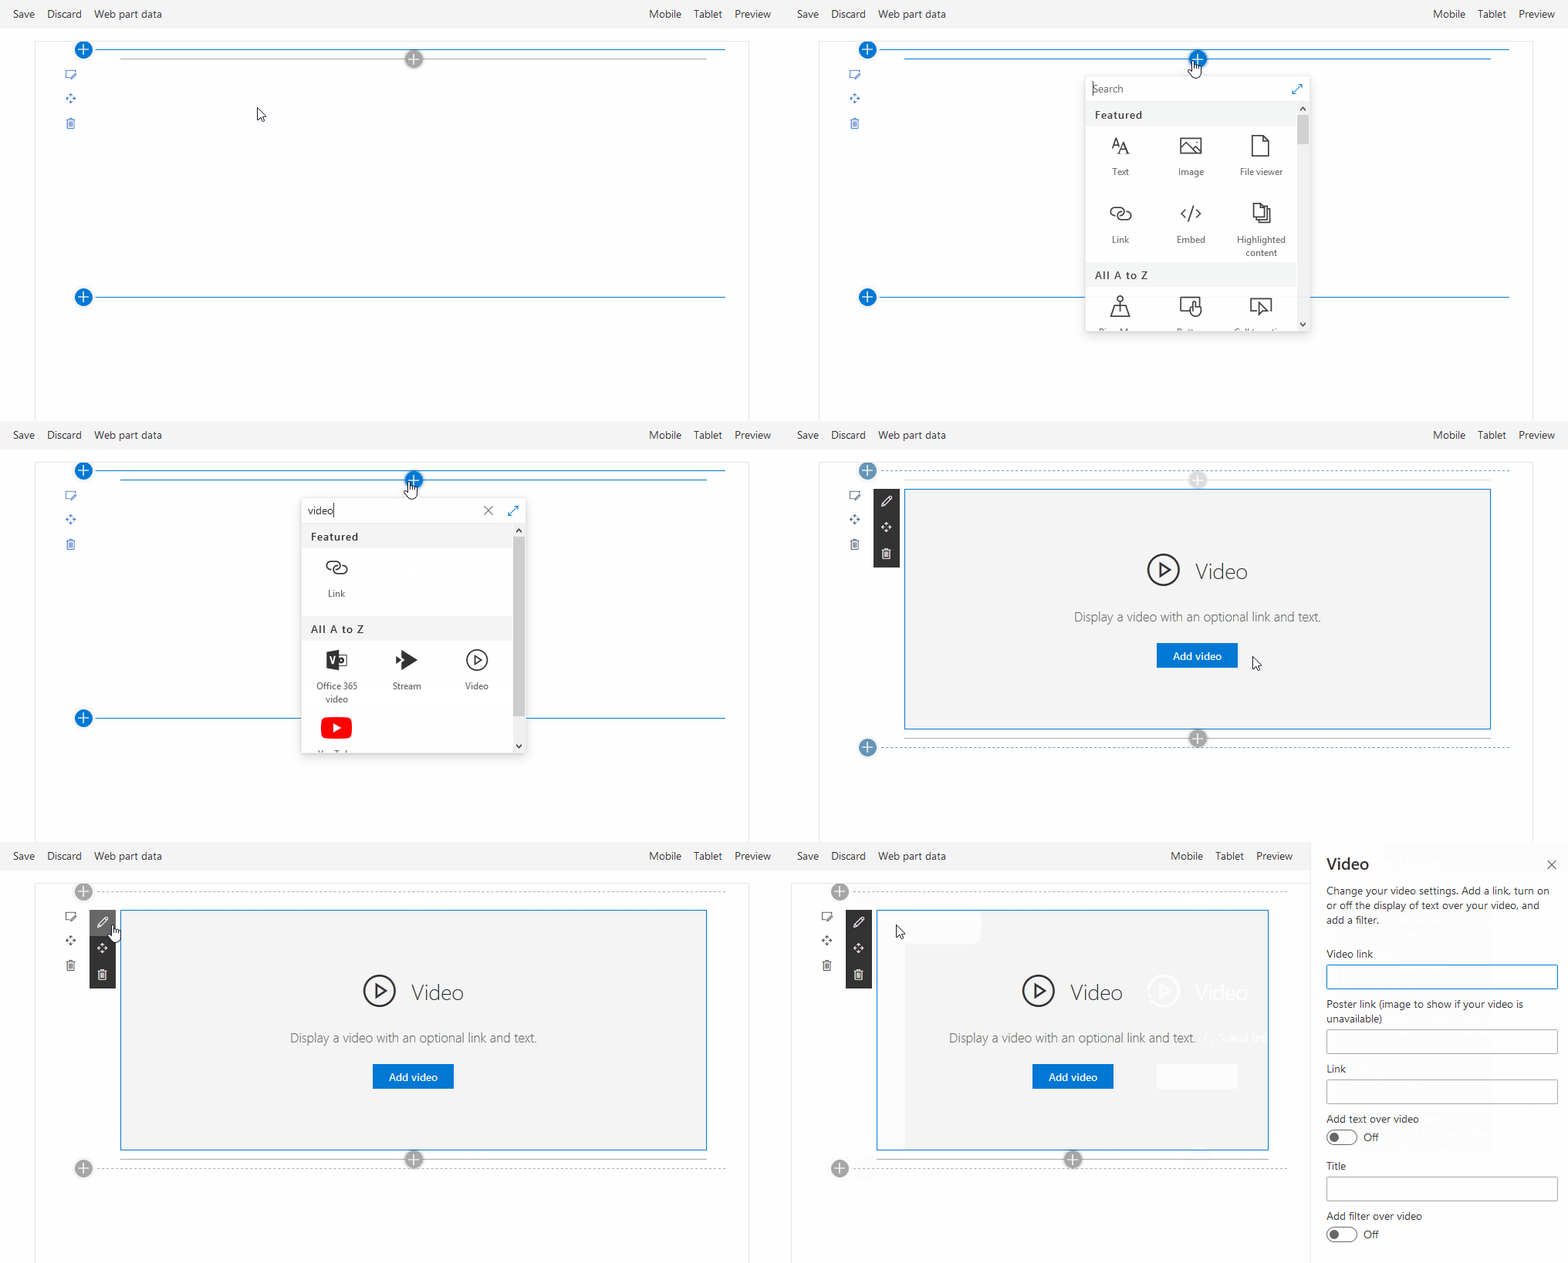
<p>Also, there is a functionality for page editors that allows to specify the video’s Url along with other options.
<img src="/assets/2019/improve-spfx-size-hero-editor.gif" alt="video web part settings" /></p>

<p>In addition to a standard SharePoint Framework web part code, this web part uses <a href="https://sharepoint.github.io/sp-dev-fx-controls-react/controls/Placeholder/">Placeholder</a> reusable control to ask an editor for a configuration. It also uses <code class="language-plaintext highlighter-rouge">css</code> function from the <a href="https://github.com/OfficeDev/office-ui-fabric-react">office-ui-fabric-react</a> package to bring multiple CSS styles into a single string.</p>

<h2 id="initial-size">Initial size</h2>

<p>I’ll be using <code class="language-plaintext highlighter-rouge">webpack-bundle-analyzer</code> as recommended in the <a href="https://docs.microsoft.com/en-us/sharepoint/dev/spfx/toolchain/optimize-builds-for-production#verify-the-contents-of-your-bundle">Optimize SharePoint Framework builds for production</a> article to analyze the final bundle size. This package generates an html file that visualizes the size and content of your builds.</p>

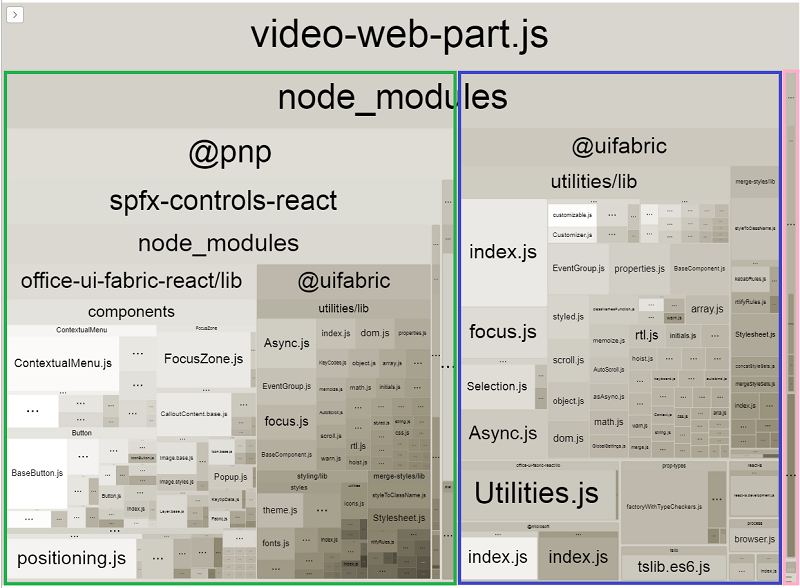
<p>Here’s what I’ve got initially:
<img src="/assets/2019/improve-spfx-size-hero-default.jpg" alt="default state" /></p>

<p>On this page I can see which packages contribute to the bundle size: in green I’ve got code required by the <code class="language-plaintext highlighter-rouge">Placeholder</code> control, in blue the code required by the <code class="language-plaintext highlighter-rouge">css</code> function, and in pink is the rest of the code including the actual logic for the video web part.</p>

<p>The size of the bundle is <strong>822Kb</strong>.</p>

<h2 id="remove-css-function">Remove css function</h2>

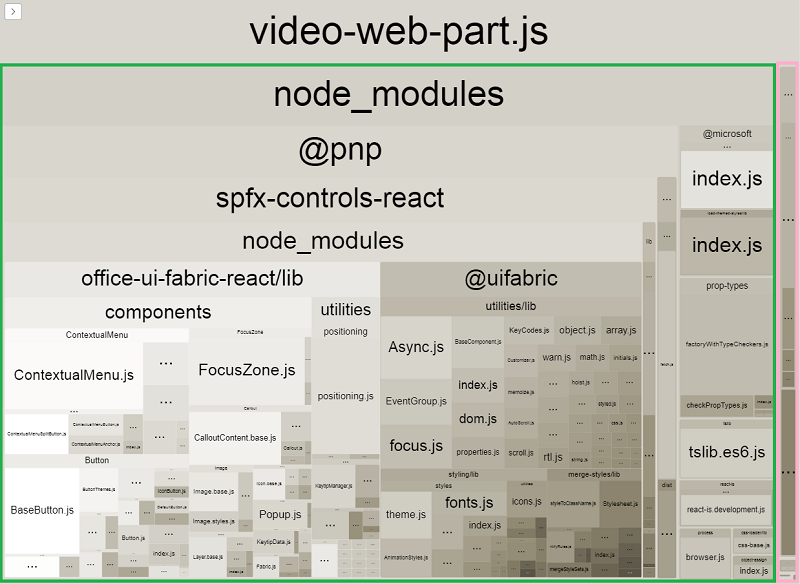
<p>As we’ve seen the <code class="language-plaintext highlighter-rouge">css</code> function from the <a href="https://github.com/OfficeDev/office-ui-fabric-react">office-ui-fabric-react</a> package contributes 200Kb to the bundle size. Most of the code is additional logic from the Office UI Fabric package, the <code class="language-plaintext highlighter-rouge">css</code> function itself is a small one. But we cannot use it without that additional code. This is fine when used along with other components and functions from the <a href="https://github.com/OfficeDev/office-ui-fabric-react">office-ui-fabric-react</a> package in larger and more complex projects. But for a single function that’s too much.</p>

<p>I’ll avoid using this function for that project by removing its import and replacing it with my own implementation:</p>

<figure class="highlight"><pre><code class="language-javascript" data-lang="javascript"><span class="kd">function</span> <span class="nx">css</span><span class="p">(...</span><span class="nx">args</span><span class="p">:</span> <span class="nx">string</span><span class="p">[])</span> <span class="p">{</span>
  <span class="k">return</span> <span class="nx">args</span><span class="p">.</span><span class="nx">join</span><span class="p">(</span><span class="dl">'</span><span class="s1"> </span><span class="dl">'</span><span class="p">);</span>
<span class="p">}</span></code></pre></figure>

<p>This simple implementation just takes passed strings and joins them into a string, but that will suffice.</p>

<p>The updated bundle looks like that:
<img src="/assets/2019/improve-spfx-size-hero-nocss.jpg" alt="default state" /></p>

<p>The size of the bundle is <strong>616Kb</strong> (which is a <strong>25%</strong> gain already).</p>

<h2 id="dynamically-load-placeholder">Dynamically load Placeholder</h2>

<p>Currently, the <code class="language-plaintext highlighter-rouge">Placeholder</code> control gets loaded for every user, be it a regular user or an editor. I don’t want to remove <code class="language-plaintext highlighter-rouge">Placeholder</code> control from the solution completely as it provides good guidance for editors when the web part is not configured properly. What I want is that this control to load only for editors when needed. Regular users should not load additional code when viewing videos.</p>

<p>I will be using the <a href="https://reactjs.org/docs/code-splitting.html#reactlazy">React.lazy</a> functionality to organize the dynamic load of the <code class="language-plaintext highlighter-rouge">Placeholder</code> control. It allows to dynamically load React components only when they are needed.
Before optimizations I use the Placeholder component like that:</p>

<figure class="highlight"><pre><code class="language-jsx" data-lang="jsx"><span class="k">import</span> <span class="p">{</span> <span class="nx">Placeholder</span> <span class="p">}</span> <span class="k">from</span> <span class="dl">"</span><span class="s2">@pnp/spfx-controls-react/lib/Placeholder</span><span class="dl">"</span><span class="p">;</span>
<span class="c1">// later in code</span>
<span class="k">return</span> <span class="p">(</span>
  <span class="p">&lt;</span><span class="nc">Placeholder</span>
    <span class="na">iconName</span><span class="p">=</span><span class="s">"MSNVideos"</span>
    <span class="na">iconText</span><span class="p">=</span><span class="s">"Video"</span>
    <span class="na">description</span><span class="p">=</span><span class="s">"Display a video with an optional link and text."</span>
    <span class="na">buttonLabel</span><span class="p">=</span><span class="s">"Add video"</span>
    <span class="na">onConfigure</span><span class="p">=</span><span class="si">{</span><span class="nx">onConfigure</span><span class="si">}</span>
  <span class="p">/&gt;</span>
<span class="p">);</span></code></pre></figure>

<p>An optimized version looks like the following:</p>

<figure class="highlight"><pre><code class="language-jsx" data-lang="jsx"><span class="k">import</span> <span class="p">{</span> <span class="nx">Suspense</span> <span class="p">}</span> <span class="k">from</span> <span class="dl">"</span><span class="s2">react</span><span class="dl">"</span><span class="p">;</span>
<span class="c1">// instead of importing directly, wrap import in React.lazy()</span>
<span class="kd">const</span> <span class="nx">PlaceholderControl</span> <span class="o">=</span> <span class="nx">React</span><span class="p">.</span><span class="nx">lazy</span><span class="p">(()</span> <span class="o">=&gt;</span>
  <span class="k">import</span><span class="p">(</span>
    <span class="dl">"</span><span class="s2">@pnp/spfx-controls-react/lib/Placeholder</span><span class="dl">"</span>
  <span class="p">).</span><span class="nx">then</span><span class="p">(({</span> <span class="nx">Placeholder</span> <span class="p">})</span> <span class="o">=&gt;</span> <span class="p">({</span> <span class="na">default</span><span class="p">:</span> <span class="nx">Placeholder</span> <span class="p">}))</span>
<span class="p">);</span>
<span class="c1">// later in code, use Suspense to wrap lazy-loaded component</span>
<span class="k">return</span> <span class="p">(</span>
  <span class="p">&lt;</span><span class="nc">Suspense</span> <span class="na">fallback</span><span class="p">=</span><span class="si">{</span><span class="p">&lt;</span><span class="nt">div</span> <span class="na">className</span><span class="p">=</span><span class="si">{</span><span class="nx">styles</span><span class="p">.</span><span class="nx">placeholder</span><span class="si">}</span><span class="p">&gt;</span><span class="ni">&amp;nbsp;</span><span class="p">&lt;/</span><span class="nt">div</span><span class="p">&gt;</span><span class="si">}</span><span class="p">&gt;</span>
    <span class="p">&lt;</span><span class="nc">PlaceholderControl</span>
      <span class="na">iconName</span><span class="p">=</span><span class="s">"MSNVideos"</span>
      <span class="na">iconText</span><span class="p">=</span><span class="s">"Video"</span>
      <span class="na">description</span><span class="p">=</span><span class="s">"Display a video with an optional link and text."</span>
      <span class="na">buttonLabel</span><span class="p">=</span><span class="s">"Add video"</span>
      <span class="na">onConfigure</span><span class="p">=</span><span class="si">{</span><span class="nx">onConfigure</span><span class="si">}</span>
    <span class="p">/&gt;</span>
  <span class="p">&lt;/</span><span class="nc">Suspense</span><span class="p">&gt;</span>
<span class="p">);</span></code></pre></figure>

<p>Note the usage of <code class="language-plaintext highlighter-rouge">React.lazy</code> and <code class="language-plaintext highlighter-rouge">Suspence</code> in the code above.</p>

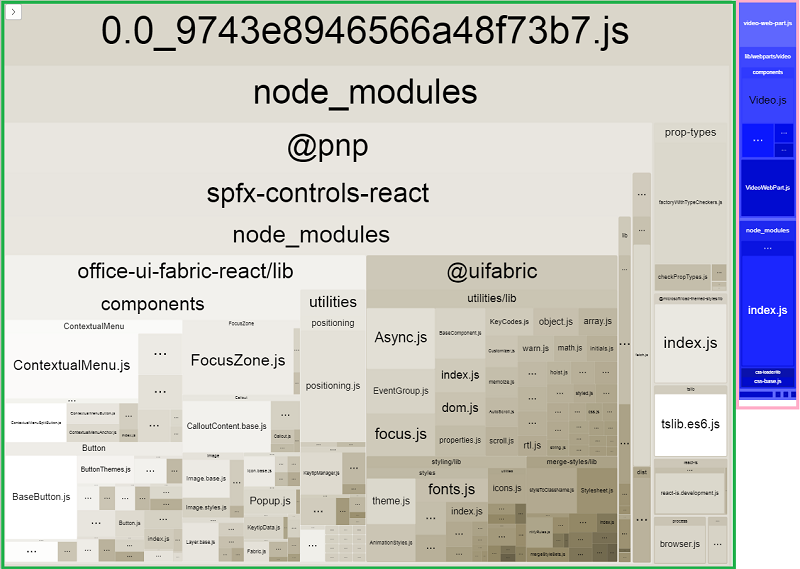
<p>Now, the bundle looks like that:
<img src="/assets/2019/improve-spfx-size-hero-lazy.jpg" alt="default state" /></p>

<p>The total bundle size would still be <strong>616Kb</strong> but now it’s been split into two parts: smaller one (<strong>28Kb</strong>) will be loaded for everyone, and a larger one (<strong>588Kb</strong>) will be loaded only for editors to show <code class="language-plaintext highlighter-rouge">Placeholder</code>.</p>

<h2 id="final-thoughts">Final thoughts</h2>

<p>With simple improvements, we’ve decreased the video web part site for most of the users from <strong>822Kb</strong> down to <strong>28Kb</strong> (<strong>96%</strong> improvement without a functionality loss). The updated source code is available in the <a href="https://github.com/dmitryrogozhny/sharepoint-lab/tree/master/video">video</a> repository.</p>

<p>When implementing SharePoint Framework solutions it is important to think about lots of things: usability, tools for page editors, and performance.</p>]]></content><author><name>Dzmitry Rahozhny (Dmitry Rogozhny)</name></author><category term="sharepoint" /><category term="spfx" /><category term="pnp" /><summary type="html"><![CDATA[It is important to remember about the performance of your SharePoint Framework solutions. We'll look at a demo web part, review its size, and after that we'll see how this web part can be improved with webpack-bundle-analyzer, and React.lazy and Suspence.]]></summary><media:thumbnail xmlns:media="http://search.yahoo.com/mrss/" url="https://dmitryrogozhny.com/assets/2019/controling-spfx-package-size-hero.jpg" /><media:content medium="image" url="https://dmitryrogozhny.com/assets/2019/controling-spfx-package-size-hero.jpg" xmlns:media="http://search.yahoo.com/mrss/" /></entry><entry><title type="html">Saving Data from Forms into SharePoint List with Power Automate</title><link href="https://dmitryrogozhny.com/blog/saving-data-from-form-to-sharepoint-list" rel="alternate" type="text/html" title="Saving Data from Forms into SharePoint List with Power Automate" /><published>2019-12-11T12:00:00+00:00</published><updated>2019-12-11T12:00:00+00:00</updated><id>https://dmitryrogozhny.com/blog/saving-data-from-form-to-sharepoint-list</id><content type="html" xml:base="https://dmitryrogozhny.com/blog/saving-data-from-form-to-sharepoint-list"><![CDATA[<p>In this post I’ll show how you can capture data with Microsoft Forms and store it in a SharePoint list. We’ll configure a Power Automate flow that will connect Forms and SharePoint.</p>

<p>I’ve previously wrote about a scenario when we were <a href="/blog/getting-intranet-feedback-with-forms-and-flow">receiving a feedback from users on intranet</a>, using Forms, a PowerAutomate flow and an Excel file as a data storage. This scenario is similar, but this time we’ll be using a SharePoint list to store the data.</p>

<h2 id="creating-form">Creating Form</h2>
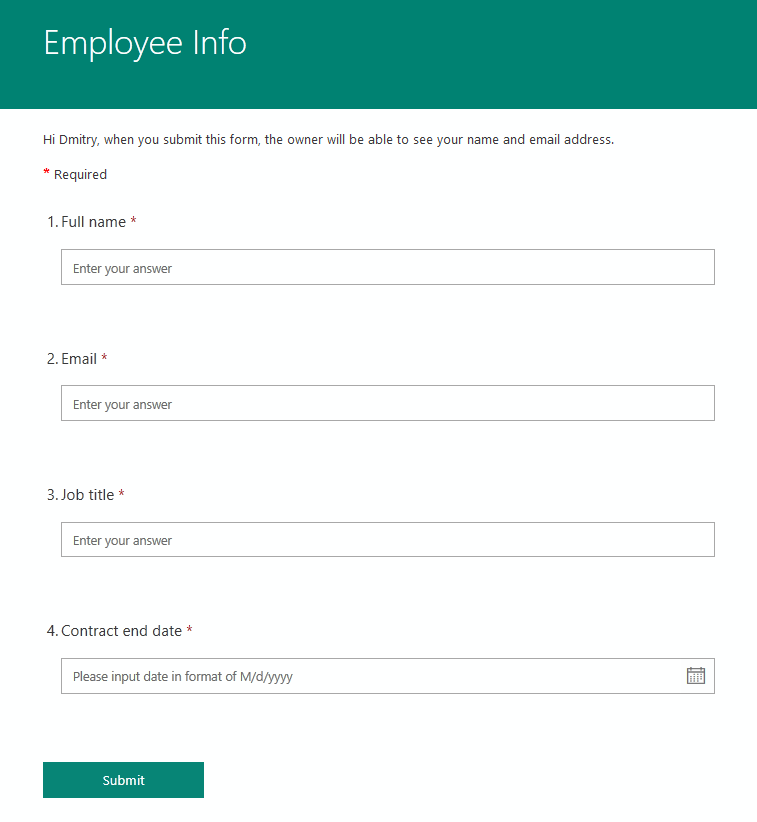
<p>Let’s start by creating a form. I would like to capture the following information about an employee: full name, email, job title, and contract end date.</p>

<p>Here’s how the final form looks like:
<img src="/assets/2019/saving-data-from-forms-into-sharepoint-list-form.jpg" alt="form" /></p>

<p>Now uses can submit data with this form.</p>

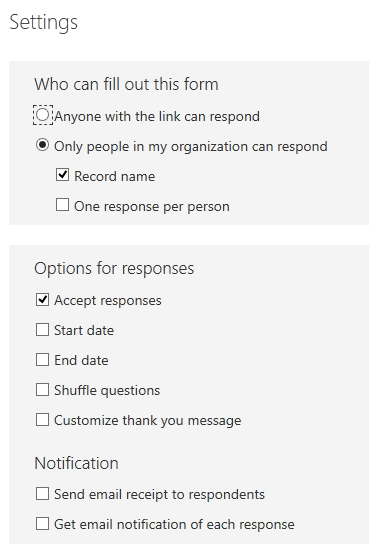
<p>We can additionally modify the form’s settings to control who can submit data, add notifications, change colors. Also we can add multilingual support:
<img src="/assets/2019/saving-data-from-forms-into-sharepoint-list-form-settings.jpg" alt="form settings" class="image--original-size-small" /></p>

<h2 id="configure-sharepoint-list">Configure SharePoint list</h2>
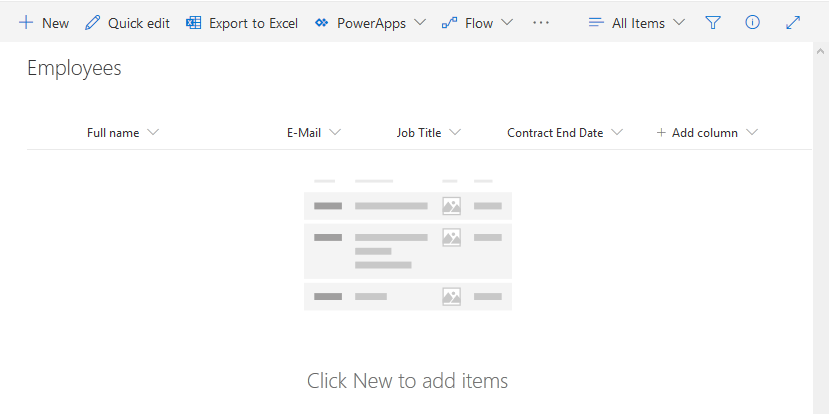
<p>Next, let’s create a new SharePoint list. I will rename the existing <code class="language-plaintext highlighter-rouge">Title</code> column into Full name, and will add the rest of the columns: e-mail, job title, and contract end date.
<img src="/assets/2019/saving-data-from-forms-into-sharepoint-list-list.jpg" alt="list" />
Now we’ve got a place to store the data.</p>
<h2 id="create-flow">Create Flow</h2>
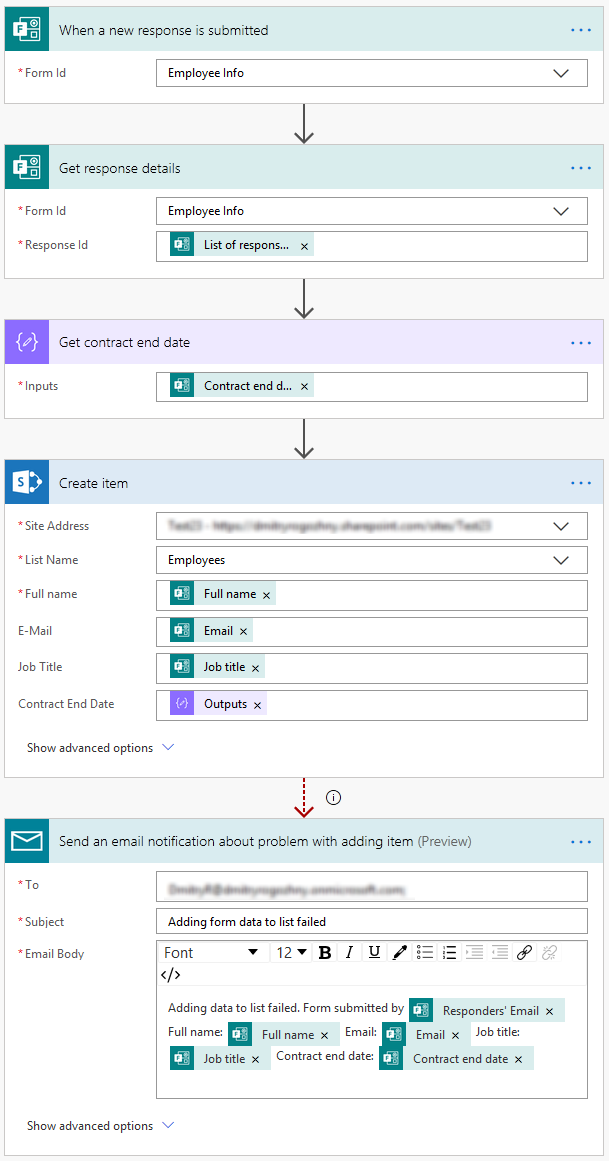
<p>Now we need to connect our form and list. I’ll create a new flow that will do that. Here’s how the flow looks like:
<img src="/assets/2019/saving-data-from-forms-into-sharepoint-list-flow.jpg" alt="list" /></p>

<p>The flow starts on new data submission in the form. It will get the values provided and create a new item in a target list.</p>

<p>There is an additional Compose action that takes the <code class="language-plaintext highlighter-rouge">Contract end date</code> value which later is used in the <code class="language-plaintext highlighter-rouge">Create Item</code> action. This is needed as the value for the contract end date is not shown as the dynamic content for the SharePoint <code class="language-plaintext highlighter-rouge">Contract end date</code> column.</p>

<p>Also note that there is an additional action at the bottom, right after creating an item in SharePoint. This action will run if inserting in a SharePoint list will fail. This way the process owner will get notified about problems and will handle them.</p>

<h2 id="improving-solution">Improving solution</h2>

<p>We have implemented a basic scenario that captures some data with Forms and saves it to a SharePoint list.</p>

<p>There are additional steps that can be performed to improve the solution:</p>
<ul>
  <li>Define and configure access permissions for the list. Only users involved in a process should be able to access it.</li>
  <li>Make the form and the list available for users: email a link to a form or share in Teams, add a link to a list to a navigation menu.</li>
  <li>Add approval or notification flows for the list. For example, we can notify list owners about new and modified items or request approval for new items.</li>
  <li>Configure default and additional views for the list depending on a scenario.</li>
  <li>Configure column sorting, filtering and formatting as needed. For example, we can highlight contract end dates that are due soon.</li>
</ul>

<p>Also remember that an automated process requires an owner that will be supporting the process, and that the process and its configuration should be documented properly.</p>]]></content><author><name>Dzmitry Rahozhny (Dmitry Rogozhny)</name></author><category term="sharepoint" /><category term="flow" /><category term="forms" /><category term="office 365" /><category term="intranet" /><summary type="html"><![CDATA[In this post I'll show how you can capture data with Microsoft Forms and store it in a SharePoint list. We'll configure a Power Automate flow that will connect Forms and SharePoint.]]></summary><media:thumbnail xmlns:media="http://search.yahoo.com/mrss/" url="https://dmitryrogozhny.com/assets/2019/saving-data-from-forms-into-sharepoint-list-hero.jpg" /><media:content medium="image" url="https://dmitryrogozhny.com/assets/2019/saving-data-from-forms-into-sharepoint-list-hero.jpg" xmlns:media="http://search.yahoo.com/mrss/" /></entry><entry><title type="html">Moving Collaboration Footer from SharePoint Starter Kit</title><link href="https://dmitryrogozhny.com/blog/moving-collab-footer-from-sharepoint-starter-kit" rel="alternate" type="text/html" title="Moving Collaboration Footer from SharePoint Starter Kit" /><published>2019-12-10T12:00:00+00:00</published><updated>2019-12-10T12:00:00+00:00</updated><id>https://dmitryrogozhny.com/blog/moving-collab-footer-from-sharepoint-starter-kit</id><content type="html" xml:base="https://dmitryrogozhny.com/blog/moving-collab-footer-from-sharepoint-starter-kit"><![CDATA[<aside>
  <p><strong>Posts in the series</strong>:</p>
  <ol>
    <li><a href="/blog/moving-footer-from-sharepoint-starter-kit-1-footer-overview">Portal footer overview</a></li>
    <li><a href="/blog/moving-footer-from-sharepoint-starter-kit-2-create-data-sources">Create data sources</a></li>
    <li><a href="/blog/moving-footer-from-sharepoint-starter-kit-3-new-project">Create new SPFx project</a></li>
    <li><a href="/blog/moving-footer-from-sharepoint-starter-kit-to-4-fix-issues">Fix issues</a></li>
    <li><a href="/blog/moving-footer-from-sharepoint-starter-kit-to-5-deploy-and-add-to-site">Deploy and add to a site</a></li>
    <li>Bonus: Moving Collaboration Footer (<em>this post</em>)</li>
  </ol>
</aside>

<p>This is the bonus post in the <a href="/blog/moving-footer-from-sharepoint-starter-kit-1-footer-overview">mini-series</a> about moving the portal footer from the <a href="https://github.com/SharePoint/sp-starter-kit">SharePoint Starter Kit</a> into a separate project.</p>

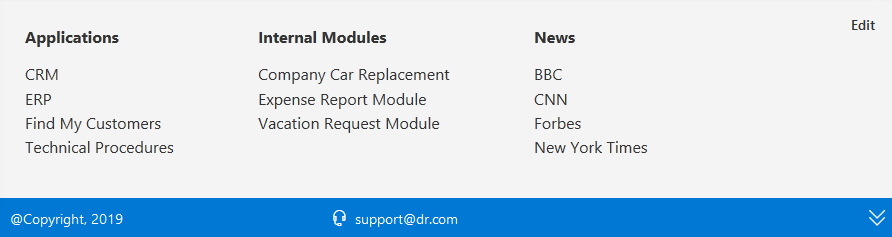
<p>This time we’re going to move to a separate project the <a href="https://github.com/SharePoint/sp-starter-kit/blob/master/documentation/components/ext-collab-footer.md">Collaboration Footer</a>:
<img src="/assets/2019/moving-collab-footer-from-sp-starter-kit-preview.jpg" alt="footer preview" /></p>

<p>You can get the source code for the final solution in the <a href="https://github.com/dmitryrogozhny/sharepoint-lab/tree/master/footer/collab-footer">collab-footer</a> repository.</p>

<p>I’ll give a shortened version of how to move the footer to a separate package. Refer to the main posts in the series for details.</p>

<h2 id="collaboration-footer-overview">Collaboration footer overview</h2>

<p>The collaboration footer is similar to the portal footer but looks a little bit different. It provides company-wide links that are stored in a term set and personal links that are stored in a user profile property.</p>

<h2 id="create-data-sources">Create data sources</h2>

<p>Let’s start by creating a term set for company-wide links and a user profile property for personal links.</p>

<p>You can provision a demo term group with the <a href="https://github.com/dmitryrogozhny/sharepoint-lab/blob/master/footer/collab-footer/provisioning/collab-footer-term-group.xml">collab-footer-term-group.xml</a> and PnP cmdlet:</p>

<figure class="highlight"><pre><code class="language-bash" data-lang="bash">Import-PnPTermGroupFromXml <span class="nt">-Path</span> ./collab-footer-term-group.xml</code></pre></figure>

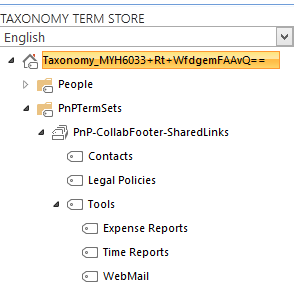
<p>This will create the <code class="language-plaintext highlighter-rouge">PnPTermSets</code> group with the <code class="language-plaintext highlighter-rouge">PnP-CollabFooter-SharedLinks</code> term set that contains demo links.
<img src="/assets/2019/moving-collab-footer-from-sp-starter-kit-term.jpg" alt="Term store" class="image--original-size-small" /></p>

<p>For personal links, we need to create a property in user profiles. The process is described in the <a href="https://github.com/SharePoint/sp-starter-kit/blob/master/documentation/tenant-settings.md#create-a-custom-property-in-the-user-profile-service">Create a Custom Property in the User Profile Service</a> section in the Starter Kit guide.</p>

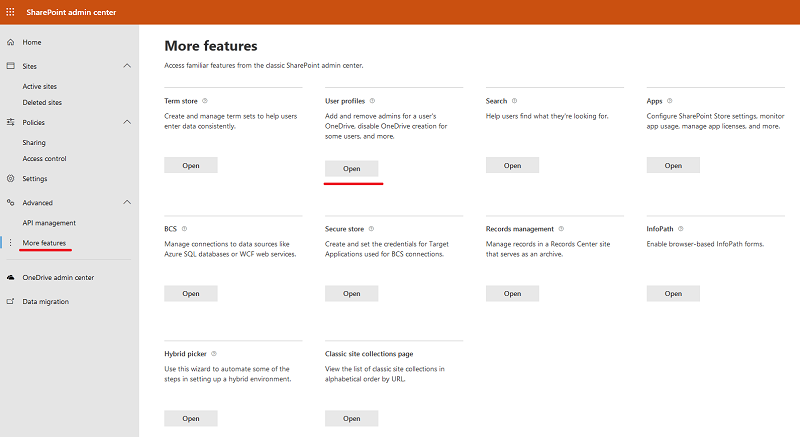
<p>The only thing to consider is that an access point for the user profiles page has been changed in the SharePoint admin center. You can now find it in the SharePoint admin center in More features → User profiles:
<img src="/assets/2019/moving-footer-from-sp-starter-kit-user-profile.jpg" alt="User profile page" /></p>

<h2 id="create-new-project">Create new project</h2>

<p>Now, we’re ready to create a new SharePoint Framework project. I’ll skip the details here, refer to the <a href="/blog/moving-footer-from-sharepoint-starter-kit-3-new-project">Moving Footer from SharePoint Starter Kit. Part 3: New Project</a> post for a detailed process description.</p>

<p>Once the project is created, we need to copy the collaboration footer files from the SharePoint Starter Kit. Copy <a href="https://github.com/SharePoint/sp-starter-kit/tree/master/solution/src/extensions/collabFooter">collabFooter</a>, <a href="https://github.com/SharePoint/sp-starter-kit/tree/master/solution/src/common">common</a>, and <a href="https://github.com/SharePoint/sp-starter-kit/tree/master/solution/src/services">services</a> folders to the <code class="language-plaintext highlighter-rouge">src</code> folder of the new project.</p>

<p><strong>Note</strong>: Keep the original <code class="language-plaintext highlighter-rouge">CollabFooterApplicationCustomizer.manifest.json</code> file from the new project. This way the collaboration footer id would be different from the one in the SharePoint Starter Kit. It is important to avoid possible collisions.</p>

<h2 id="deploy-and-add-to-site">Deploy and add to site</h2>

<p>Now you can use <code class="language-plaintext highlighter-rouge">gulp serve</code> to start the debug version of the footer.</p>

<p>To deploy the final solution you can use pre-built <a href="https://github.com/dmitryrogozhny/sharepoint-lab/tree/master/footer/collab-footer/package">collab-footer.sppkg</a> package or build it with the source code:</p>

<figure class="highlight"><pre><code class="language-bash" data-lang="bash">gulp clean
gulp bundle <span class="nt">--ship</span>
gulp package-solution <span class="nt">--ship</span></code></pre></figure>

<h3 id="deploy-package-to-the-app-site">Deploy package to the App site</h3>

<p>Now we need to deploy our app to the App catalog site collection. After that, we can install the app with the footer on sites.</p>

<h3 id="add-footer-to-site">Add footer to site</h3>

<p>We can add the footer to a site by installing the footer app on this site. This can be done in UI by going to Site Content → New App → collab-footer-client-side-solution.</p>

<p>The same can be done in PowerShell (I’m using PnP PowerShell cmdlets here):</p>

<figure class="highlight"><pre><code class="language-bash" data-lang="bash">Connect-PnPOnline SITE_URL
Install-PnPApp <span class="nt">-Identity</span> APP_ID</code></pre></figure>

<p>Here <code class="language-plaintext highlighter-rouge">SITE_URL</code> is the url of the site you want to add the footer to; APP_ID is the unique id of the application. You can get the id by listing all the applications with the <code class="language-plaintext highlighter-rouge">Get-PnPApp</code> cmdlet.</p>

<p>After adding the app to the site, the footer will appear:
<img src="/assets/2019/moving-footer-from-sp-starter-kit-collab.gif" alt="collab footer in action" /></p>]]></content><author><name>Dzmitry Rahozhny (Dmitry Rogozhny)</name></author><category term="sharepoint" /><category term="spfx" /><category term="pnp" /><summary type="html"><![CDATA[This time we're going to move to a separate project the Collaboration Footer from the SharePoint Starter Kit. It provides company-wide links that are stored in a term set and personal links that are stored in a user profile property. The collaboration footer is similar to the portal footer but looks a little bit different.]]></summary><media:thumbnail xmlns:media="http://search.yahoo.com/mrss/" url="https://dmitryrogozhny.com/assets/2019/moving-collab-footer-from-sp-starter-kit-hero.jpg" /><media:content medium="image" url="https://dmitryrogozhny.com/assets/2019/moving-collab-footer-from-sp-starter-kit-hero.jpg" xmlns:media="http://search.yahoo.com/mrss/" /></entry><entry><title type="html">Moving Footer from SharePoint Starter Kit. Part 5: Deploy and Add to Site</title><link href="https://dmitryrogozhny.com/blog/moving-footer-from-sharepoint-starter-kit-to-5-deploy-and-add-to-site" rel="alternate" type="text/html" title="Moving Footer from SharePoint Starter Kit. Part 5: Deploy and Add to Site" /><published>2019-12-01T12:00:00+00:00</published><updated>2019-12-01T12:00:00+00:00</updated><id>https://dmitryrogozhny.com/blog/moving-footer-from-sharepoint-starter-kit-to-5-deploy-and-add-to-site</id><content type="html" xml:base="https://dmitryrogozhny.com/blog/moving-footer-from-sharepoint-starter-kit-to-5-deploy-and-add-to-site"><![CDATA[<aside>
  <p><strong>Posts in the series</strong>:</p>
  <ol>
    <li><a href="/blog/moving-footer-from-sharepoint-starter-kit-1-footer-overview">Portal footer overview</a></li>
    <li><a href="/blog/moving-footer-from-sharepoint-starter-kit-2-create-data-sources">Create data sources</a></li>
    <li><a href="/blog/moving-footer-from-sharepoint-starter-kit-3-new-project">Create new SPFx project</a></li>
    <li><a href="/blog/moving-footer-from-sharepoint-starter-kit-to-4-fix-issues">Fix issues</a></li>
    <li>Deploy and add to a site (<em>this post</em>)</li>
    <li><a href="/blog/moving-collab-footer-from-sharepoint-starter-kit">Bonus: Moving Collaboration Footer</a></li>
  </ol>
</aside>

<p>This time we’re going to look at how to deploy the package to a tenant and how to add the footer to a site.</p>

<h2 id="building-a-package">Building a package</h2>

<p>You can use an already built <a href="https://github.com/dmitryrogozhny/sharepoint-lab/blob/master/footer/portal-footer/package/">portal-footer.sppkg</a> package available in the repository.</p>

<p>If you want, you can also build the package by yourself:</p>

<figure class="highlight"><pre><code class="language-bash" data-lang="bash">gulp clean
gulp bundle <span class="nt">--ship</span>
gulp package-solution <span class="nt">--ship</span></code></pre></figure>

<p>This will build the package using the latest version of the source code.</p>

<h2 id="deploy-package-to-the-app-site">Deploy package to the App site</h2>

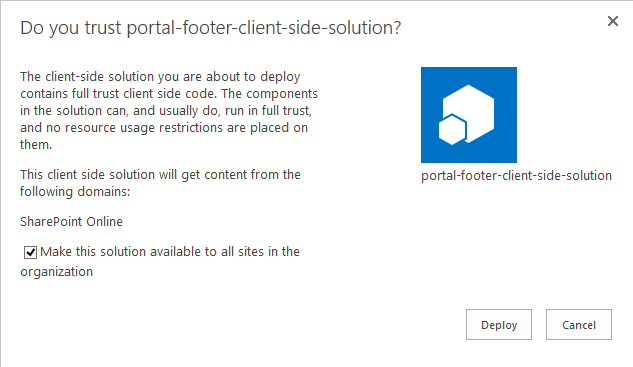
<p>Now we need to deploy our app to the App catalog site collection. When asked, I select that the solution should be available to all sites in the tenant. After that, we can add the footer on sites.
<img src="/assets/2019/moving-footer-from-sp-starter-kit-app-catalog.jpg" alt="deployment dialog" class="image--original-size-small" /></p>

<h2 id="add-footer-to-site">Add footer to site</h2>

<p>We can add the footer to a site by adding it as custom action. This can be done in PowerShell (I’m using PnP PowerShell cmdlets here):</p>

<figure class="highlight"><pre><code class="language-bash" data-lang="bash">Connect-PnPOnline SITE_URL
Add-PnPCustomAction <span class="nt">-Title</span> <span class="s2">"PortalFooter"</span> <span class="nt">-Name</span> <span class="s2">"PortalFooter"</span> <span class="nt">-Location</span> <span class="s2">"ClientSideExtension.ApplicationCustomizer"</span> <span class="nt">-ClientSideComponentId</span> 57e0a101-017b-4b4f-8f06-c0d29cd53092 <span class="nt">-ClientSideComponentProperties</span> <span class="s2">"{</span><span class="sb">`</span><span class="s2">"linksListTitle</span><span class="sb">`</span><span class="s2">":</span><span class="sb">`</span><span class="s2">"PnP-PortalFooter-Links</span><span class="sb">`</span><span class="s2">",</span><span class="sb">`</span><span class="s2">"copyright</span><span class="sb">`</span><span class="s2">":</span><span class="sb">`</span><span class="s2">"Ⓒ Copyright Contoso, 2019-2020</span><span class="sb">`</span><span class="s2">",</span><span class="sb">`</span><span class="s2">"support</span><span class="sb">`</span><span class="s2">":</span><span class="sb">`</span><span class="s2">"support2@2.com</span><span class="sb">`</span><span class="s2">",</span><span class="sb">`</span><span class="s2">"personalItemsStorageProperty</span><span class="sb">`</span><span class="s2">":</span><span class="sb">`</span><span class="s2">"PnP-CollabFooter-MyLinks</span><span class="sb">`</span><span class="s2">"}"</span></code></pre></figure>

<p>Here <code class="language-plaintext highlighter-rouge">SITE_URL</code> is the url of the site you want to add the footer to.</p>

<h2 id="changing-footer-settings">Changing footer settings</h2>

<p>If you need to change settings for a footer, for example, a support email, you can do that by removing existing footer and adding a new one with updated settings.</p>

<p>In the snippet below, we connect to a site, list all custom actions to find the Id of the portal footer. Next, we remove this custom action (replace ACTION_ID with your footer’s custom action id) and add a new one with modified settings.</p>

<figure class="highlight"><pre><code class="language-bash" data-lang="bash">Connect-PnPOnline SITE_URL

Get-PnPCustomAction <span class="nt">-Scope</span> All

Remove-PnPCustomAction <span class="nt">-Identity</span> ACTION_ID
Add-PnPCustomAction <span class="nt">-Title</span> <span class="s2">"PortalFooter"</span> <span class="nt">-Name</span> <span class="s2">"PortalFooter"</span> <span class="nt">-Location</span> <span class="s2">"ClientSideExtension.ApplicationCustomizer"</span> <span class="nt">-ClientSideComponentId</span> 57e0a101-017b-4b4f-8f06-c0d29cd53092 <span class="nt">-ClientSideComponentProperties</span> <span class="s2">"{</span><span class="sb">`</span><span class="s2">"linksListTitle</span><span class="sb">`</span><span class="s2">":</span><span class="sb">`</span><span class="s2">"PnP-PortalFooter-Links</span><span class="sb">`</span><span class="s2">",</span><span class="sb">`</span><span class="s2">"copyright</span><span class="sb">`</span><span class="s2">":</span><span class="sb">`</span><span class="s2">"Ⓒ Copyright Contoso, 2019-2020</span><span class="sb">`</span><span class="s2">",</span><span class="sb">`</span><span class="s2">"support</span><span class="sb">`</span><span class="s2">":</span><span class="sb">`</span><span class="s2">"support2@2.com</span><span class="sb">`</span><span class="s2">",</span><span class="sb">`</span><span class="s2">"personalItemsStorageProperty</span><span class="sb">`</span><span class="s2">":</span><span class="sb">`</span><span class="s2">"PnP-CollabFooter-MyLinks</span><span class="sb">`</span><span class="s2">"}"</span></code></pre></figure>

<h2 id="adding-footer-with-site-design">Adding footer with site design</h2>
<p>We can also create a site design that will automatically add a footer to newly created sites. For this, we need to create a site script like that:</p>

<figure class="highlight"><pre><code class="language-json" data-lang="json"><span class="p">{</span><span class="w">
  </span><span class="nl">"$schema"</span><span class="p">:</span><span class="w"> </span><span class="s2">"schema.json"</span><span class="p">,</span><span class="w">
  </span><span class="nl">"actions"</span><span class="p">:</span><span class="w"> </span><span class="p">[</span><span class="w">
    </span><span class="p">{</span><span class="w">
      </span><span class="nl">"verb"</span><span class="p">:</span><span class="w"> </span><span class="s2">"associateExtension"</span><span class="p">,</span><span class="w">
      </span><span class="nl">"title"</span><span class="p">:</span><span class="w"> </span><span class="s2">"PortalFooter"</span><span class="p">,</span><span class="w">
      </span><span class="nl">"location"</span><span class="p">:</span><span class="w"> </span><span class="s2">"ClientSideExtension.ApplicationCustomizer"</span><span class="p">,</span><span class="w">
      </span><span class="nl">"clientSideComponentId"</span><span class="p">:</span><span class="w"> </span><span class="s2">"57e0a101-017b-4b4f-8f06-c0d29cd53092"</span><span class="p">,</span><span class="w">
      </span><span class="nl">"clientSideComponentProperties"</span><span class="p">:</span><span class="w"> </span><span class="s2">"{</span><span class="se">\"</span><span class="s2">linksListTitle</span><span class="se">\"</span><span class="s2">:</span><span class="se">\"</span><span class="s2">PnP-PortalFooter-Links</span><span class="se">\"</span><span class="s2">,</span><span class="se">\"</span><span class="s2">copyright</span><span class="se">\"</span><span class="s2">:</span><span class="se">\"</span><span class="s2">Ⓒ Copyright Contoso, 2019-2020</span><span class="se">\"</span><span class="s2">,</span><span class="se">\"</span><span class="s2">support</span><span class="se">\"</span><span class="s2">:</span><span class="se">\"</span><span class="s2">support@contoso.com</span><span class="se">\"</span><span class="s2">,</span><span class="se">\"</span><span class="s2">personalItemsStorageProperty</span><span class="se">\"</span><span class="s2">:</span><span class="se">\"</span><span class="s2">PnP-CollabFooter-MyLinks</span><span class="se">\"</span><span class="s2">}"</span><span class="p">,</span><span class="w">
      </span><span class="nl">"scope"</span><span class="p">:</span><span class="w"> </span><span class="s2">"Web"</span><span class="w">
    </span><span class="p">}</span><span class="w">
  </span><span class="p">],</span><span class="w">
  </span><span class="nl">"bindata"</span><span class="p">:</span><span class="w"> </span><span class="p">{},</span><span class="w">
  </span><span class="nl">"version"</span><span class="p">:</span><span class="w"> </span><span class="mi">1</span><span class="w">
</span><span class="p">}</span></code></pre></figure>

<p>Next, we can create a site design that will contain this script. Finally, we can assign the site design to a site.</p>

<p>This will add the footer to a site when a site design got applied.</p>

<h2 id="alternative-if-application-is-not-deployed-globally">ALTERNATIVE: If application is not deployed globally</h2>

<p>There might be a case when your application cannot be deployed tenant-wide. In this case, the process of adding a footer to a site will be different.</p>

<p>The main difference is that you need to install the app with the footer on a site first. After that, the footer will be available.</p>

<h2 id="add-footer-to-site-1">Add footer to site</h2>

<p>We can add the footer to a site by installing the footer app on this site. This can be done in UI by going to Site Content → New App → portal-footer-client-side-solution.</p>

<p>The same can be done in PowerShell (I’m using PnP PowerShell cmdlets here):</p>

<figure class="highlight"><pre><code class="language-bash" data-lang="bash">Connect-PnPOnline SITE_URL
Install-PnPApp <span class="nt">-Identity</span> APP_ID</code></pre></figure>

<p>Here <code class="language-plaintext highlighter-rouge">SITE_URL</code> is the url of the site you want to add the footer to; APP_ID is the unique id of the application. You can get the id by listing all the applications with the <code class="language-plaintext highlighter-rouge">Get-PnPApp</code> cmdlet.</p>

<p>After adding the app to the site, the footer will appear.</p>

<h3 id="changing-footer-settings-1">Changing footer settings</h3>

<p>The process for changing footer settings will be the same as with a globally deployed solution.</p>

<h3 id="adding-footer-with-site-design-1">Adding footer with site design</h3>
<p>To add a footer that is not globally available with a site design, we need to create a site script like that:</p>

<figure class="highlight"><pre><code class="language-json" data-lang="json"><span class="p">{</span><span class="w">
  </span><span class="nl">"$schema"</span><span class="p">:</span><span class="w"> </span><span class="s2">"schema.json"</span><span class="p">,</span><span class="w">
  </span><span class="nl">"actions"</span><span class="p">:</span><span class="w"> </span><span class="p">[</span><span class="w">
    </span><span class="p">{</span><span class="w">
      </span><span class="nl">"verb"</span><span class="p">:</span><span class="w"> </span><span class="s2">"installSolution"</span><span class="p">,</span><span class="w">
      </span><span class="nl">"id"</span><span class="p">:</span><span class="w"> </span><span class="s2">"APP_ID"</span><span class="p">,</span><span class="w">
      </span><span class="nl">"name"</span><span class="p">:</span><span class="w"> </span><span class="s2">"portal-footer-client-side-solution"</span><span class="w">
    </span><span class="p">}</span><span class="w">
  </span><span class="p">],</span><span class="w">
  </span><span class="nl">"bindata"</span><span class="p">:</span><span class="w"> </span><span class="p">{},</span><span class="w">
  </span><span class="nl">"version"</span><span class="p">:</span><span class="w"> </span><span class="mi">1</span><span class="w">
</span><span class="p">}</span></code></pre></figure>

<h2 id="final-thoughts">Final Thoughts</h2>

<p>In this series we’ve moved the Portal Footer from the SharePoint Starter Kit to a separate solution. The same approach can be applied to other starter kit components. This allows to get a package that contains only needed components that can be modified according to your business requirements.</p>]]></content><author><name>Dzmitry Rahozhny (Dmitry Rogozhny)</name></author><category term="sharepoint" /><category term="spfx" /><category term="pnp" /><summary type="html"><![CDATA[Posts in the series: Portal footer overview Create data sources Create new SPFx project Fix issues Deploy and add to a site (this post) Bonus: Moving Collaboration Footer]]></summary><media:thumbnail xmlns:media="http://search.yahoo.com/mrss/" url="https://dmitryrogozhny.com/assets/2019/moving-footer-from-sp-starter-kit-5-hero.jpg" /><media:content medium="image" url="https://dmitryrogozhny.com/assets/2019/moving-footer-from-sp-starter-kit-5-hero.jpg" xmlns:media="http://search.yahoo.com/mrss/" /></entry><entry><title type="html">Moving Footer from SharePoint Starter Kit. Part 4: Fix Issues</title><link href="https://dmitryrogozhny.com/blog/moving-footer-from-sharepoint-starter-kit-to-4-fix-issues" rel="alternate" type="text/html" title="Moving Footer from SharePoint Starter Kit. Part 4: Fix Issues" /><published>2019-11-30T12:00:00+00:00</published><updated>2019-11-30T12:00:00+00:00</updated><id>https://dmitryrogozhny.com/blog/moving-footer-from-sharepoint-starter-kit-to-4-fix-issues</id><content type="html" xml:base="https://dmitryrogozhny.com/blog/moving-footer-from-sharepoint-starter-kit-to-4-fix-issues"><![CDATA[<aside>
  <p><strong>Posts in the series</strong>:</p>
  <ol>
    <li><a href="/blog/moving-footer-from-sharepoint-starter-kit-1-footer-overview">Portal footer overview</a></li>
    <li><a href="/blog/moving-footer-from-sharepoint-starter-kit-2-create-data-sources">Create data sources</a></li>
    <li><a href="/blog/moving-footer-from-sharepoint-starter-kit-3-new-project">Create new SPFx project</a></li>
    <li>Fix issues (<em>this post</em>)</li>
    <li><a href="/blog/moving-footer-from-sharepoint-starter-kit-to-5-deploy-and-add-to-site">Deploy and add to a site</a></li>
    <li><a href="/blog/moving-collab-footer-from-sharepoint-starter-kit">Bonus: Moving Collaboration Footer</a></li>
  </ol>
</aside>

<p>In the previous part, we’ve started the footer on a test site.</p>

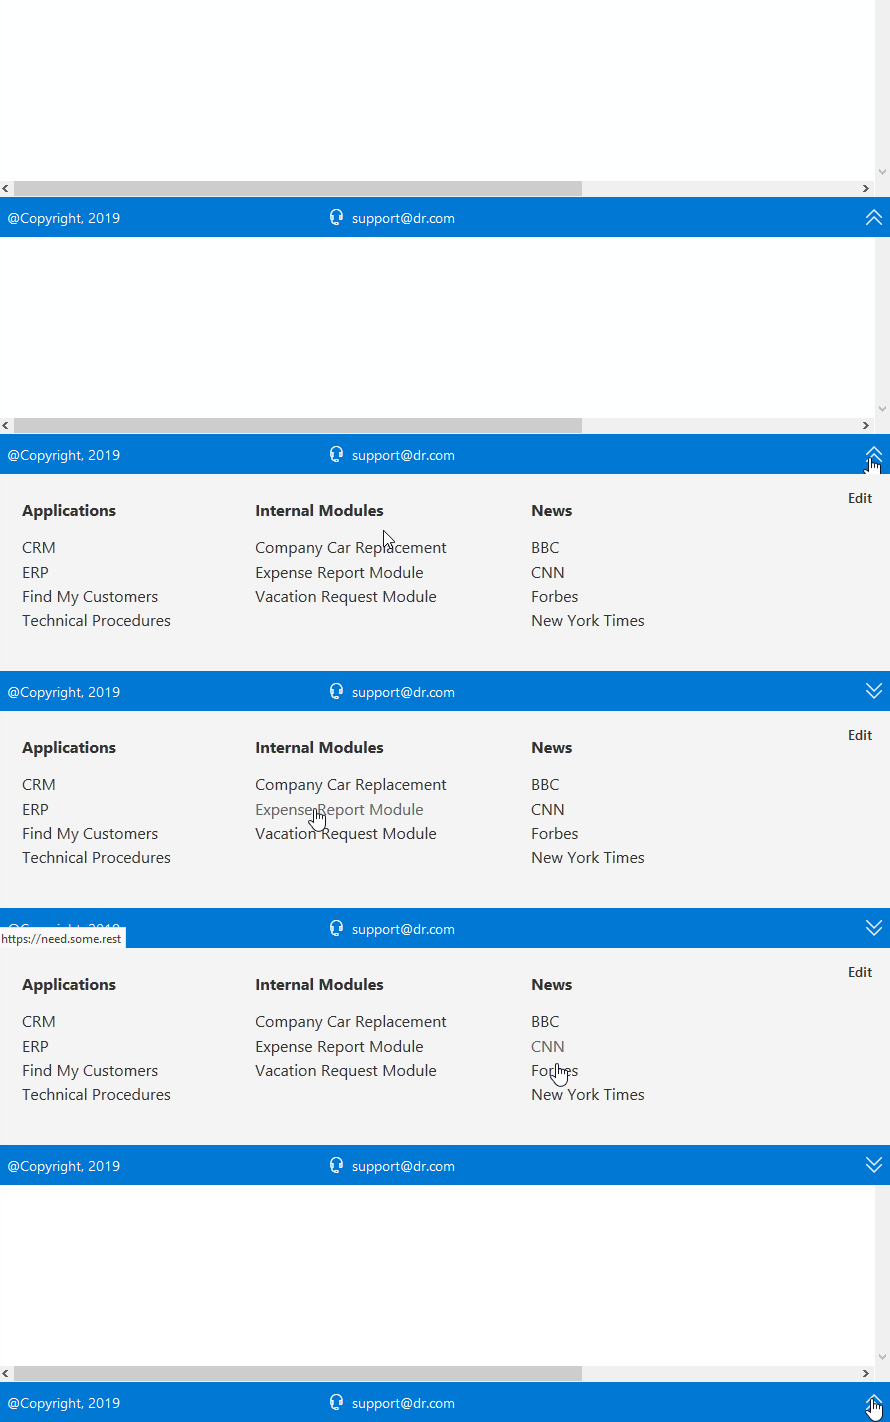
<p>But depending on your SharePoint Online environment you may encounter two issues:
<strong>broken layout for the footer</strong>:
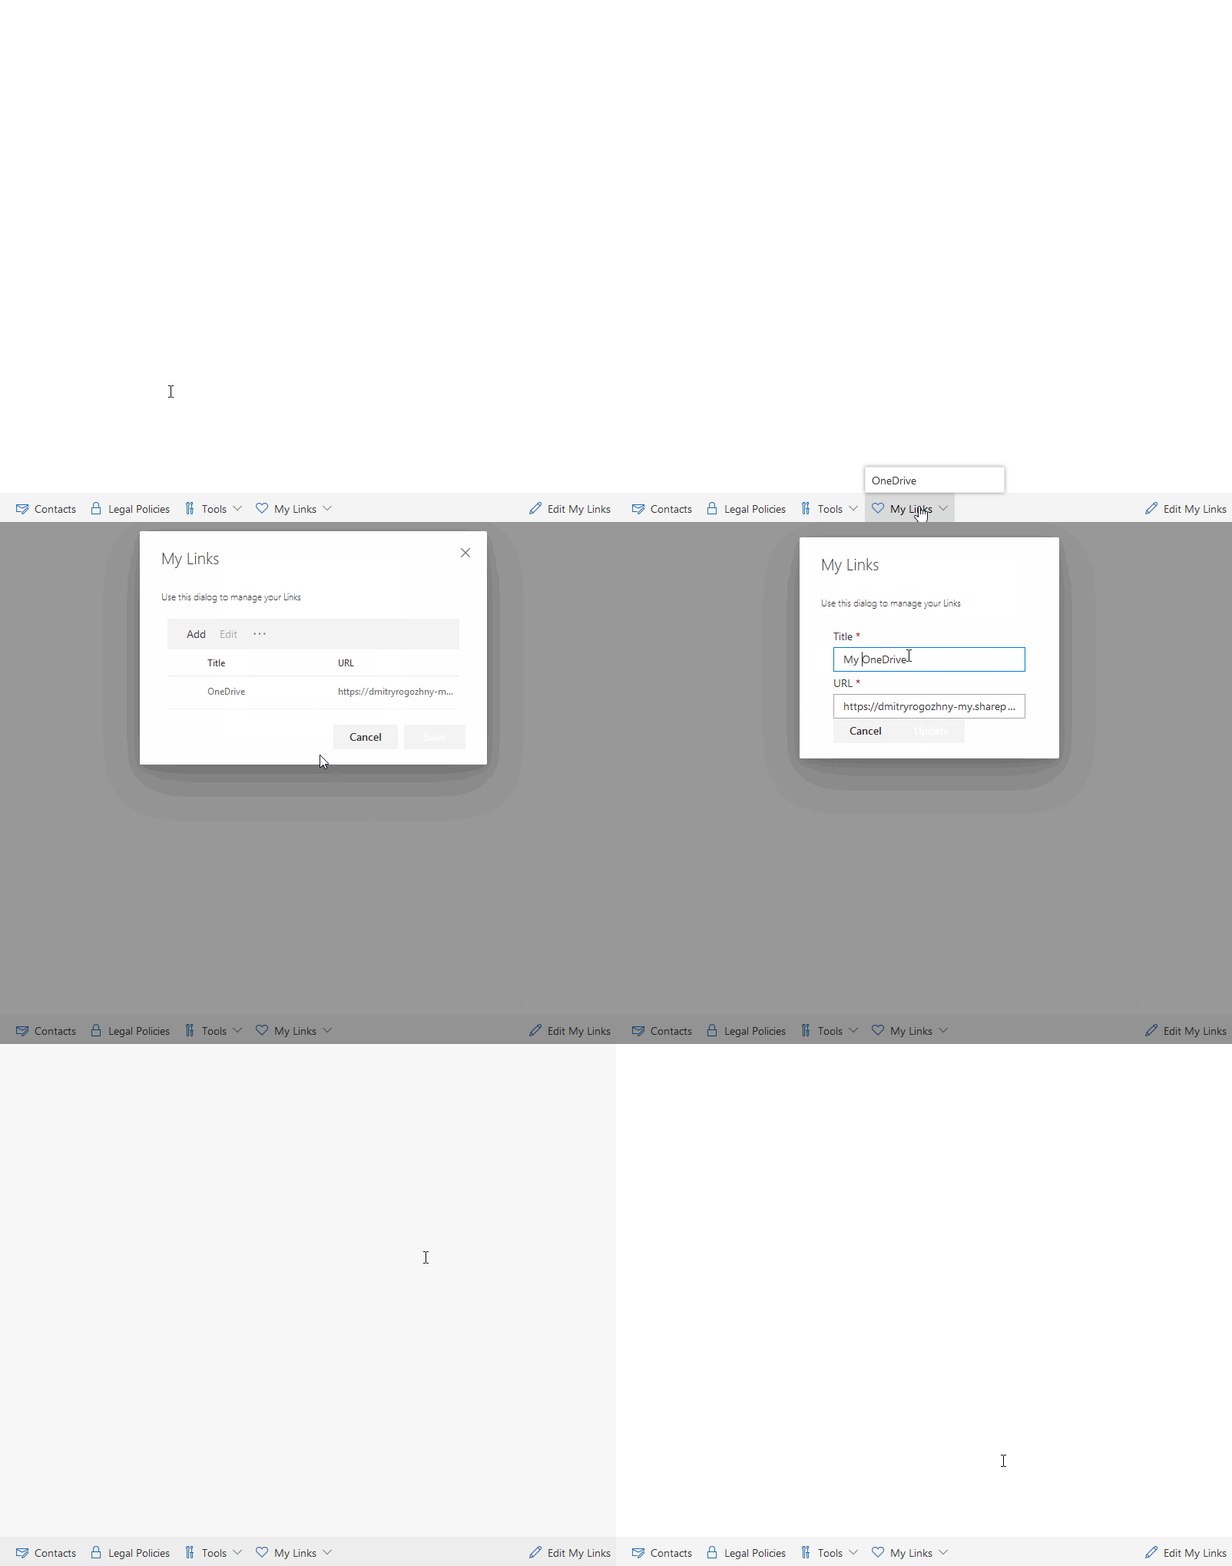
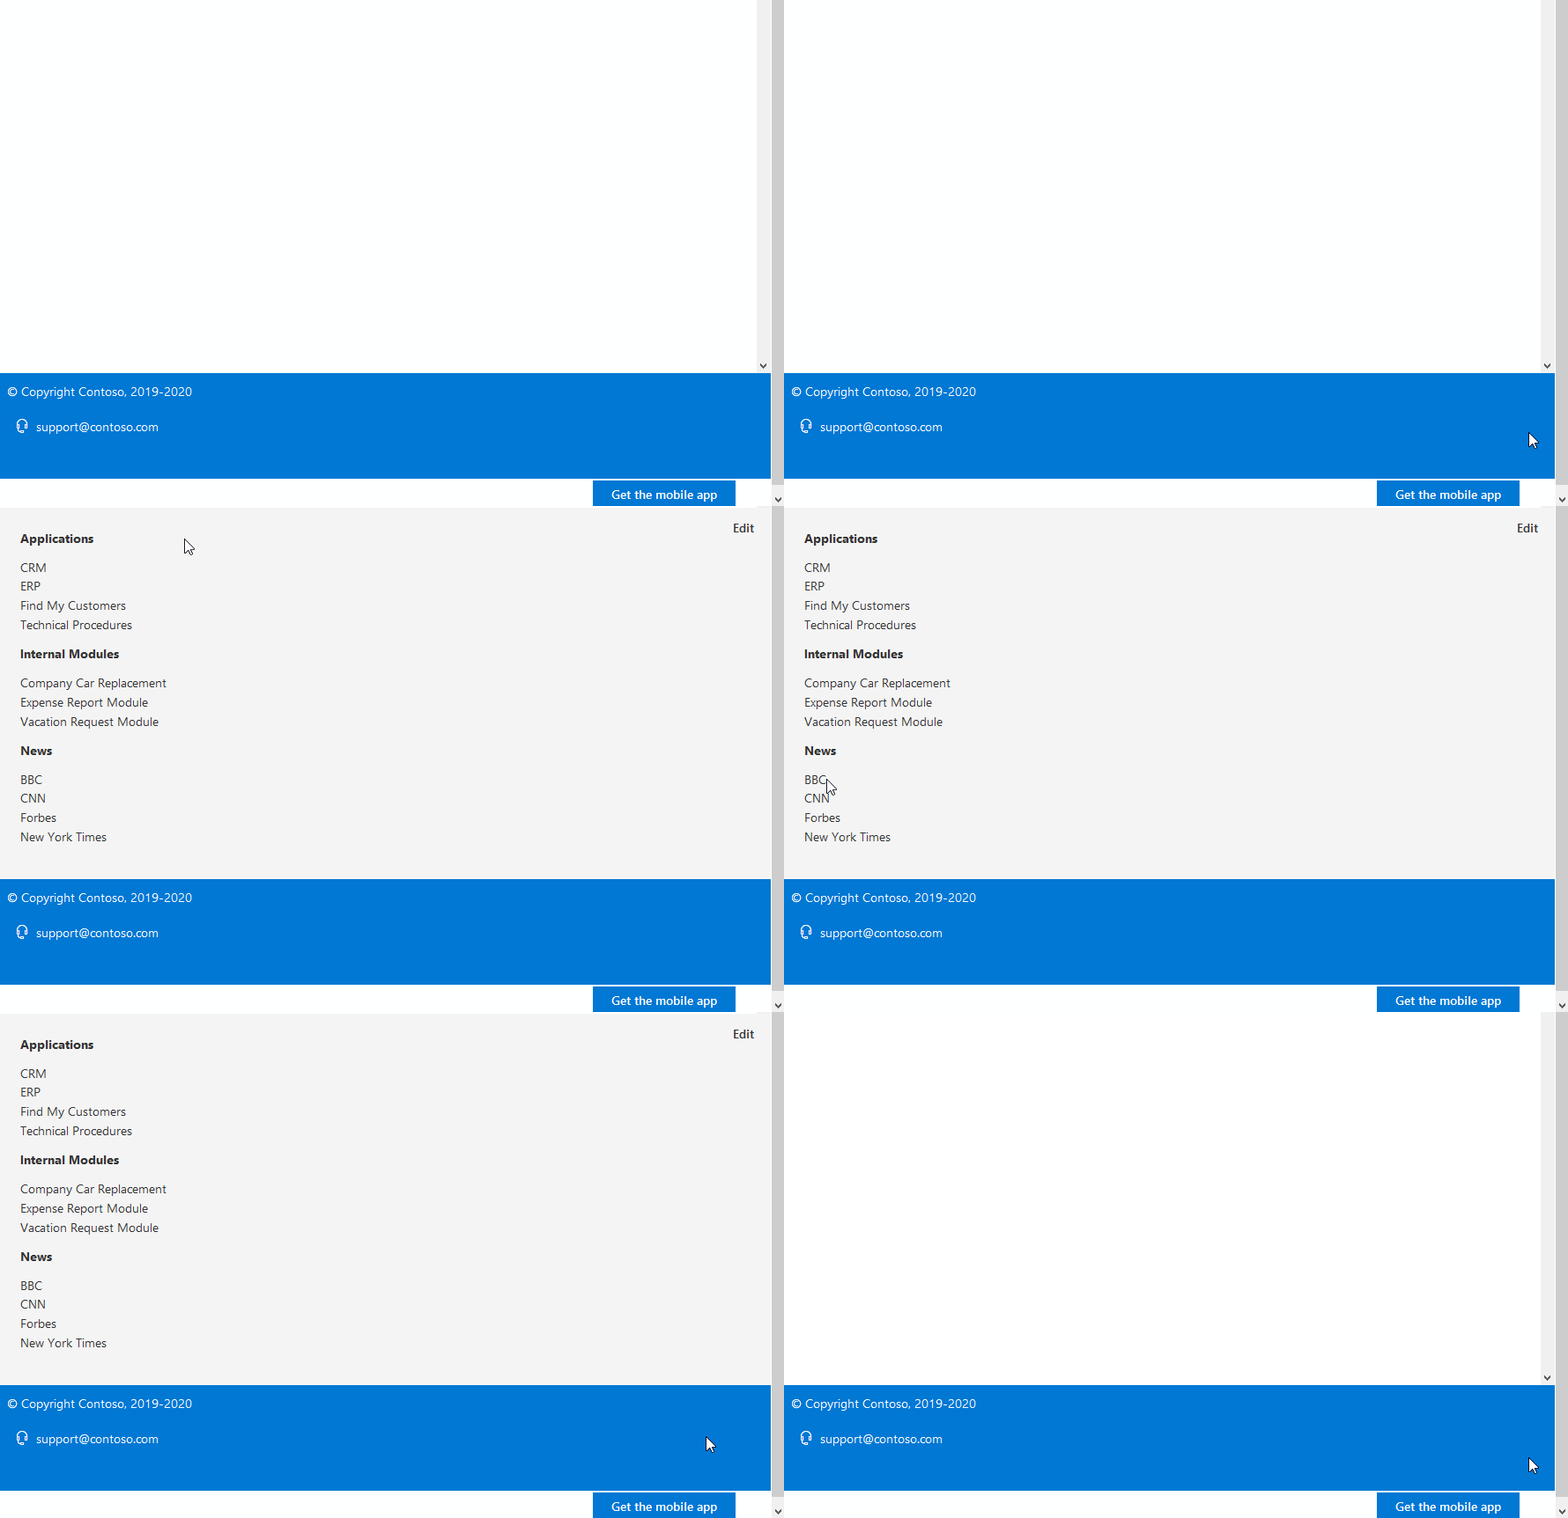
<img src="/assets/2019/moving-footer-from-sp-starter-kit-footer-preview-broken.gif" alt="Broken footer in action" /></p>

<p><strong>Personal links dialog does not open</strong>.
<img src="/assets/2019/moving-footer-from-sp-starter-kit-footer-broken-personal.gif" alt="Broken personal links" /></p>

<p>This time we’re going to fix that.</p>

<h2 id="issue-1-broken-layout">Issue 1: Broken layout</h2>
<p>The reason for the problem is that the footer uses <a href="https://developer.microsoft.com/en-us/fabric">Office UI Fabric</a> global CSS classes, such as “ms-Grid” and “ms-sm2”, directly in the markup:</p>

<figure class="highlight"><pre><code class="language-html" data-lang="html"><span class="nt">&lt;div</span> <span class="na">className=</span><span class="s">"ms-Grid"</span><span class="nt">&gt;</span>
  <span class="nt">&lt;div</span> <span class="na">className=</span><span class="s">"ms-Grid-row"</span><span class="nt">&gt;</span>
    <span class="nt">&lt;div</span> <span class="na">className=</span><span class="s">"ms-Grid-col ms-sm3"</span> <span class="na">onClick=</span><span class="s">{</span> <span class="na">this._handleToggle</span> <span class="err">}</span><span class="nt">&gt;</span>
      <span class="nt">&lt;Label</span> <span class="na">className=</span><span class="s">{styles.copyright}</span><span class="nt">&gt;</span>{this.props.copyright}<span class="nt">&lt;/Label&gt;</span>
    <span class="nt">&lt;/div&gt;</span>
    <span class="nt">&lt;div</span> <span class="na">className=</span><span class="s">"ms-Grid-col ms-sm2"</span><span class="nt">&gt;</span>
      ...
    <span class="nt">&lt;/div&gt;</span>
    <span class="nt">&lt;div</span> <span class="na">className=</span><span class="s">"ms-Grid-col ms-sm6"</span> <span class="na">onClick=</span><span class="s">{</span> <span class="na">this._handleToggle</span> <span class="err">}</span><span class="nt">&gt;</span>
      ...
    <span class="nt">&lt;/div&gt;</span>
    <span class="nt">&lt;div</span> <span class="na">className=</span><span class="s">"ms-Grid-col ms-sm1"</span> <span class="na">onClick=</span><span class="s">{</span> <span class="na">this._handleToggle</span> <span class="err">}</span><span class="nt">&gt;</span>
      ...
    <span class="nt">&lt;/div&gt;</span>
  <span class="nt">&lt;/div&gt;</span>
<span class="nt">&lt;/div&gt;</span></code></pre></figure>

<p>I wrote about that problem in the <a href="/blog/using-office-ui-fabric-in-spfx">Common Issue When Using Office UI Fabric in SPFx Projects</a>. And here’s an excerpt from the <a href="https://docs.microsoft.com/en-us/sharepoint/dev/spfx/office-ui-fabric-integration">Using Office UI Fabric Core and Fabric React in SharePoint Framework</a> article:</p>
<blockquote>
  <p>To achieve reliability, one of the main problems we need to solve is that of Global CSS styles. This accounts to <strong>not using global class names in the HTML markup and instead using Fabric Core mixins and variables in the Sass declaration file</strong>. This involves importing the Fabric Core’s Sass declarations in your Sass file and then consuming the variables and mixins appropriately.</p>
</blockquote>

<p>So in order to fix this issue, we need to use mixins provided by Office UI Fabric instead of using global class names.</p>

<h3 id="why-does-it-work-in-starter-kit">Why does it work in Starter Kit?</h3>
<p>The footer layout works fine in the SharePoint starter kit because there are other extensions that add Office UI Fabric global CSS classes to a page. The footer uses these classes for its layout. Once we’ve moved the footer away, these CSS classes won’t be loaded (as we do not request them).</p>

<h3 id="how-to-fix-layout">How to fix layout</h3>
<p>To fix the layout we need to use Office UI Fabric mixins instead of global CSS classes. So instead of referencing classes like:</p>

<figure class="highlight"><pre><code class="language-html" data-lang="html"><span class="nt">&lt;div</span> <span class="na">className=</span><span class="s">"ms-Grid"</span><span class="nt">&gt;</span></code></pre></figure>

<p>we need to define a class in the <code class="language-plaintext highlighter-rouge">PortalFooter.module.scss</code> file like this:</p>

<figure class="highlight"><pre><code class="language-less" data-lang="less">.grid {
    @include ms-Grid;
}</code></pre></figure>

<p>after that we can use this class in our layout:</p>

<figure class="highlight"><pre><code class="language-html" data-lang="html"><span class="nt">&lt;div</span> <span class="na">className=</span><span class="s">{styles.grid}</span><span class="nt">&gt;</span></code></pre></figure>

<h3 id="fixing-mylinks-dialog">Fixing myLinks dialog</h3>
<p>The dialog for adding personal links has got the same issue with global CSS class names. We need to fix it in the same way.</p>

<h2 id="issue-2-personal-links-dialog-does-not-open">Issue 2: Personal links dialog does not open</h2>
<p>A dialog for personal links may disappear right after opening it:
<img src="/assets/2019/moving-footer-from-sp-starter-kit-footer-broken-personal.gif" alt="Broken personal links" /></p>

<p>The reason for that is that a user profile property that stores personal links for a user will return <code class="language-plaintext highlighter-rouge">undefined</code> on first use. The dialog for editing personal links expects an array of links and fails. We need to explicitly process that in the code and pass an empty array when the user profile property value is undefined.</p>

<h3 id="fix-issues-in-sp-starter-kit">Fix issues in sp-starter-kit</h3>
<p>Now that we’ve got these issues fixed in a local repository, we need to apply the same fixes to the original <a href="https://github.com/SharePoint/sp-starter-kit">SharePoint Starter Kit</a>.</p>

<p>I’ve forked the starter kit repository, applied the same fixes, and created pull requests to add them to the original repository.</p>

<h2 id="final-solution">Final solution</h2>
<p>Ok, now let’s run the project again with <code class="language-plaintext highlighter-rouge">gulp serve</code>.</p>

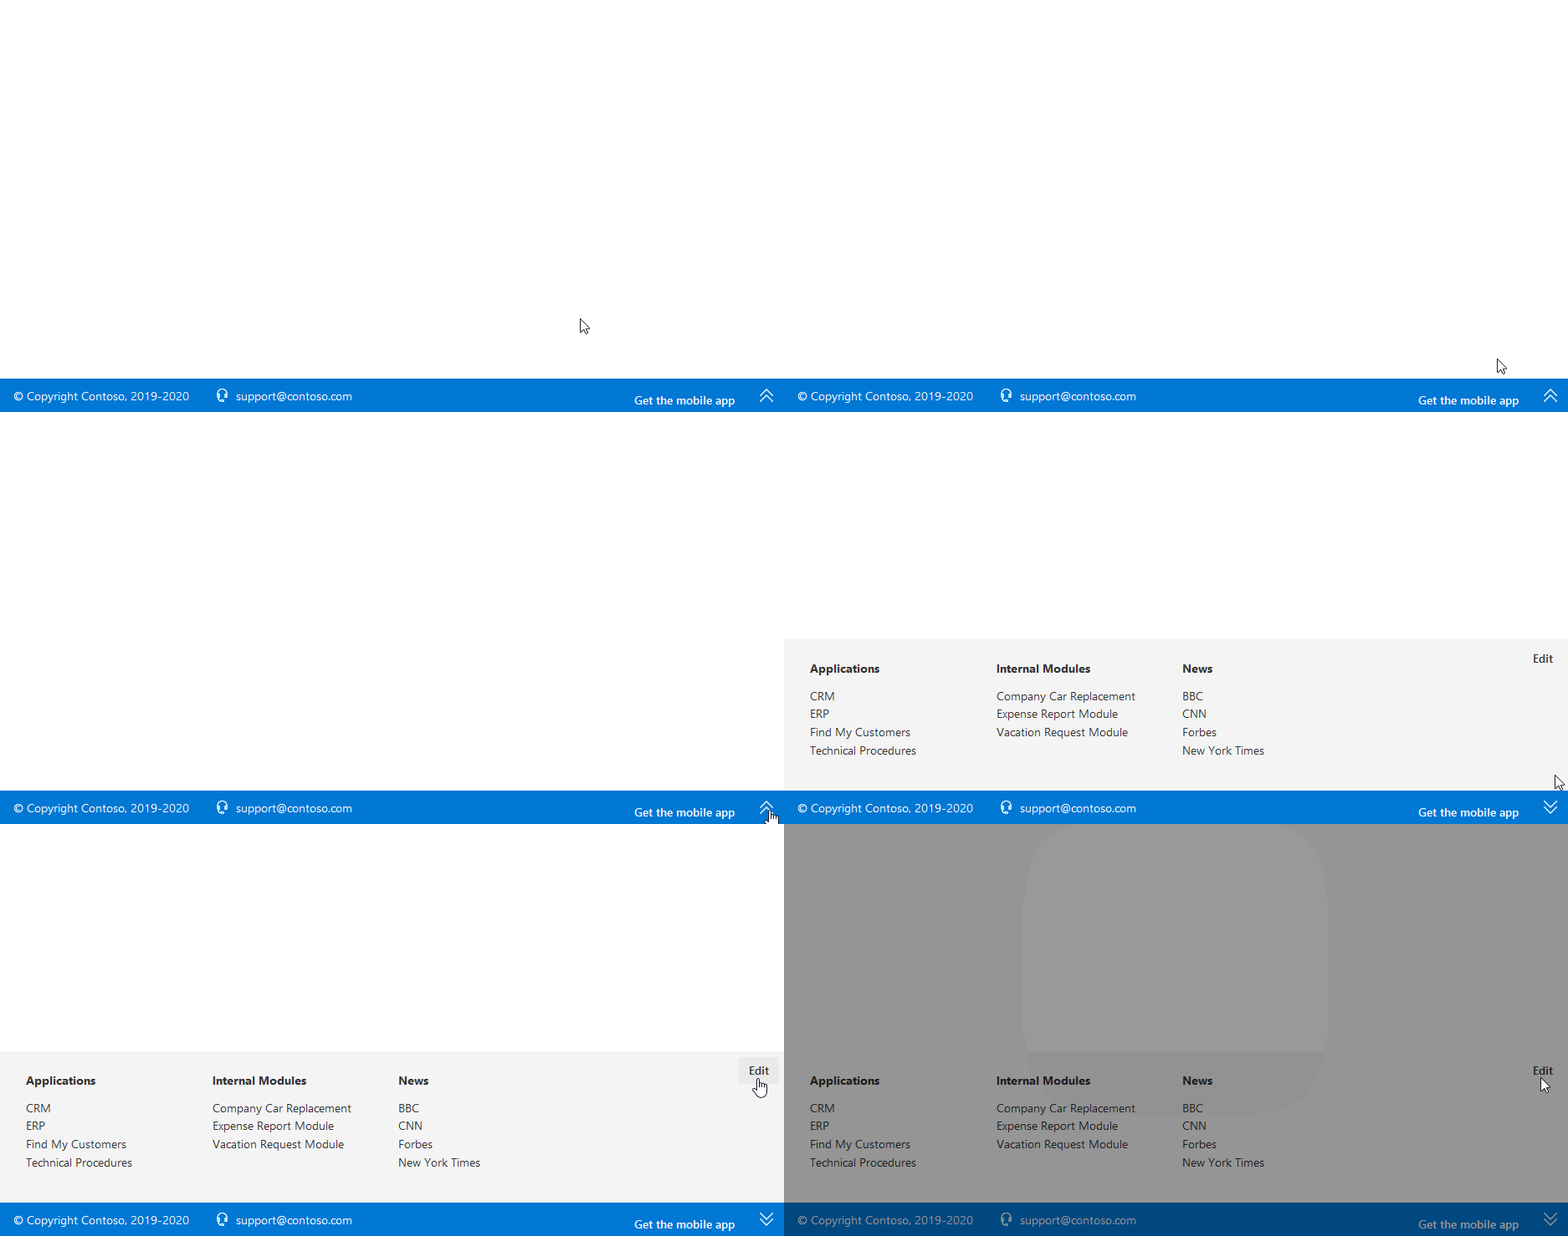
<p>It will open a page with a footer. This time, it should look as expected and everything should work properly.
<img src="/assets/2019/moving-footer-from-sp-starter-kit-footer-preview.gif" alt="Footer in action" /></p>

<p>Now we’ve got the footer working as expected.</p>

<p>The last thing we have left is to look at how to deploy and add the footer to sites. We’ll look at that next time.</p>]]></content><author><name>Dzmitry Rahozhny (Dmitry Rogozhny)</name></author><category term="sharepoint" /><category term="spfx" /><category term="pnp" /><summary type="html"><![CDATA[Posts in the series: Portal footer overview Create data sources Create new SPFx project Fix issues (this post) Deploy and add to a site Bonus: Moving Collaboration Footer]]></summary><media:thumbnail xmlns:media="http://search.yahoo.com/mrss/" url="https://dmitryrogozhny.com/assets/2019/moving-footer-from-sp-starter-kit-4-hero.jpg" /><media:content medium="image" url="https://dmitryrogozhny.com/assets/2019/moving-footer-from-sp-starter-kit-4-hero.jpg" xmlns:media="http://search.yahoo.com/mrss/" /></entry><entry><title type="html">Moving Footer from SharePoint Starter Kit. Part 3: New Project</title><link href="https://dmitryrogozhny.com/blog/moving-footer-from-sharepoint-starter-kit-3-new-project" rel="alternate" type="text/html" title="Moving Footer from SharePoint Starter Kit. Part 3: New Project" /><published>2019-11-29T12:00:00+00:00</published><updated>2019-11-29T12:00:00+00:00</updated><id>https://dmitryrogozhny.com/blog/moving-footer-from-sharepoint-starter-kit-3-new-project</id><content type="html" xml:base="https://dmitryrogozhny.com/blog/moving-footer-from-sharepoint-starter-kit-3-new-project"><![CDATA[<aside>
  <p><strong>Posts in the series</strong>:</p>
  <ol>
    <li><a href="/blog/moving-footer-from-sharepoint-starter-kit-1-footer-overview">Portal footer overview</a></li>
    <li><a href="/blog/moving-footer-from-sharepoint-starter-kit-2-create-data-sources">Create data sources</a></li>
    <li>Create new SPFx project (<em>this post</em>)</li>
    <li><a href="/blog/moving-footer-from-sharepoint-starter-kit-to-4-fix-issues">Fix issues</a></li>
    <li><a href="/blog/moving-footer-from-sharepoint-starter-kit-to-5-deploy-and-add-to-site">Deploy and add to a site</a></li>
    <li><a href="/blog/moving-collab-footer-from-sharepoint-starter-kit">Bonus: Moving Collaboration Footer</a></li>
  </ol>
</aside>

<p>This time we will move the source code for the footer from the SharePoint Starter Kit into a new project.</p>

<h2 id="create-new-project">Create new project</h2>

<p>Let’s start by creating a new SharePoint Framework project.</p>

<p>Here’re the settings I’ve used creating a new project with <code class="language-plaintext highlighter-rouge">yo @microsoft/sharepoint</code>:</p>
<ul>
  <li>What is your solution name? <strong>portal-footer</strong></li>
  <li>Where do you want to place the files? <strong>Create a subfolder with solution name</strong></li>
  <li>Do you want to allow the tenant admin the choice of being able to deploy the solution to all sites immediately without running any feature deployment or adding apps in sites? <strong>Yes</strong></li>
  <li>Will the components in the solution require permissions to access web APIs that are unique and not shared with other components in the tenant? <strong>No</strong></li>
  <li>Which type of client-side component to create? <strong>Extension</strong></li>
  <li>Which type of client-side extension to create? <strong>Application Customizer</strong></li>
  <li>What is your Application Customizer name? <strong>PortalFooter</strong></li>
  <li>What is your Application Customizer description? <strong>PortalFooter description</strong></li>
</ul>

<p><strong>Note</strong>: I’ve selected to allow the tenant admin to be able to deploy the solution tenant-wide. This is not required but it makes it easier to deploy and manage.</p>

<p>The project generator will create a new project and will install additional packages. Once done, navigate to the project folder and execute <code class="language-plaintext highlighter-rouge">gulp build</code> to make sure that the generated project works fine.</p>

<p>Now it’s time to move the portal footer’s code into the project.</p>

<h2 id="get-sharepoint-starter-kit-code">Get SharePoint Starter Kit code</h2>

<p>We need to clone the source code of the SharePoint Starter Kit. You can do that by running:</p>

<figure class="highlight"><pre><code class="language-shell" data-lang="shell">git clone https://github.com/SharePoint/sp-starter-kit.git</code></pre></figure>

<p>The source code for the footer is located in the <a href="https://github.com/SharePoint/sp-starter-kit/tree/master/solution/src/extensions/portalFooter"><code class="language-plaintext highlighter-rouge">sp-starter-kit/solution/src/extensions/portalFooter</code></a> folder;</p>

<h2 id="copy-portal-footer-code-to-new-project">Copy Portal Footer code to new project</h2>

<p>Now, copy all the files, except the manifest file <code class="language-plaintext highlighter-rouge">PortalFooterApplicationCustomizer.manifest.json</code>, from the SharePoint Starter kit <code class="language-plaintext highlighter-rouge">sp-starter-kit/solution/src/extensions/portalFooter</code> folder to the new project folder <code class="language-plaintext highlighter-rouge">portal-footer/src/extensions/portalFooter</code>.</p>

<p><strong>Note</strong>: While copying, you’ll rewrite the application customizer file <code class="language-plaintext highlighter-rouge">PortalFooterApplicationCustomizer.ts</code> and localization files from the <code class="language-plaintext highlighter-rouge">loc</code> folder.</p>

<p><strong>Note 2</strong>: It is important that you leave the original manifest file untouched. This way the footer in the new project will have a unique id that is different from the footer id from SharePoint Starter kit. This will allow to avoid possible collisions.</p>

<h2 id="copy-additional-files">Copy additional files</h2>

<p>At this stage, if you’ll try to build the project, you’ll get error messages about missing files.</p>

<p>This is because the portal footer uses some common code from the Starter Kit. We need to copy this code as well.
In addition to the footer extension’s code you need to copy to the new project:</p>
<ul>
  <li>From the <code class="language-plaintext highlighter-rouge">sp-starter-kit/solution/src/services</code> folder copy <code class="language-plaintext highlighter-rouge">SPUserProfileService.ts</code> and <code class="language-plaintext highlighter-rouge">SPUserProfileTypes.ts</code> files to the <code class="language-plaintext highlighter-rouge">portal-footer/src/services</code> folder. These files allow to work with the user profile service.</li>
  <li>Copy the <code class="language-plaintext highlighter-rouge">sp-starter-kit/solution/src/common</code> folder to the <code class="language-plaintext highlighter-rouge">portal-footer/src/common</code> folder. It contains <code class="language-plaintext highlighter-rouge">myLinks</code> component that allows to edit personal links.</li>
</ul>

<p>For <code class="language-plaintext highlighter-rouge">myLinks</code> component to work properly, you need to add its resources file to the <code class="language-plaintext highlighter-rouge">portal-footer/config/config.json</code> file. Modify the <code class="language-plaintext highlighter-rouge">localizedResources</code> property to include the following:</p>

<figure class="highlight"><pre><code class="language-shell" data-lang="shell"><span class="s2">"localizedResources"</span>: <span class="o">{</span>
  <span class="s2">"PortalFooterApplicationCustomizerStrings"</span>: <span class="s2">"lib/extensions/portalFooter/loc/{locale}.js"</span>,
  <span class="s2">"MyLinksStrings"</span>: <span class="s2">"lib/common/myLinks/loc/{locale}.js"</span>
<span class="o">}</span></code></pre></figure>

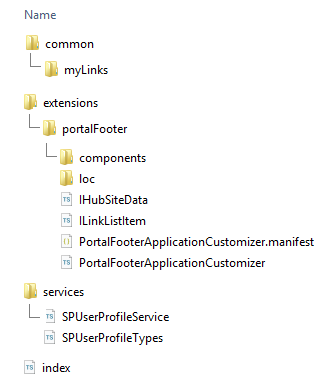
<p>Your <code class="language-plaintext highlighter-rouge">src</code> folder structure would look like that:
<img src="/assets/2019/moving-footer-from-sp-starter-kit-file-structure.jpg" alt="Files structure" class="image--original-size-small" /></p>

<p>Now we’ve got all the source code we need.</p>

<h2 id="add-missing-npm-packages">Add missing npm packages</h2>

<p>The portal footer uses <a href="https://pnp.github.io/pnpjs/documentation/getting-started/">@pnp/sp</a> package to get SharePoint list items.</p>

<p>We need to add this package and its dependencies to our project by running:</p>

<figure class="highlight"><pre><code class="language-shell" data-lang="shell">npm <span class="nb">install</span> @pnp/sp @pnp/common @pnp/logging @pnp/odata</code></pre></figure>

<h2 id="fix-paths-to-office-fabric-ui-classes">Fix paths to Office Fabric UI classes</h2>

<p>The footer uses <a href="https://docs.microsoft.com/en-us/sharepoint/dev/spfx/office-ui-fabric-integration">@microsoft/sp-office-ui-fabric-core</a> package to reference <a href="https://developer.microsoft.com/en-us/fabric#/">Office UI Fabric</a> styles.</p>

<p>This package is not available in the new project. We can either add it with <code class="language-plaintext highlighter-rouge">npm install @microsoft/sp-office-ui-fabric-core</code> or we can reference Office UI Fabric styles from the available <code class="language-plaintext highlighter-rouge">"office-ui-fabric-react"</code> package.</p>

<p>I will do the latter by replacing the “@import ‘~@microsoft/sp-office-ui-fabric-core/dist/sass/SPFabricCore.scss’;” with “@import ‘~office-ui-fabric-react/dist/sass/_References.scss’;” in all <code class="language-plaintext highlighter-rouge">.scss</code> files. With this approach, we won’t need to install an additional package.</p>

<h2 id="build-and-run-the-solution">Build and run the solution</h2>

<p>Ok, we are ready to build the solution. Run <code class="language-plaintext highlighter-rouge">gulp build</code> to build the solution and this time there should be no errors.</p>

<p>To run the solution, there is one thing we still need to do.</p>

<p>Modify the <code class="language-plaintext highlighter-rouge">portal-footer/config/serve.json</code> file and in the “default” configuration section replace the “pageUrl” value “https://contoso.sharepoint.com/sites/mySite/SitePages/myPage.aspx” with your test site Url. If you don’t have a test site ready, refer to the <a href="/blog/moving-footer-from-sharepoint-starter-kit-2-create-data-sources">Part 2: Data Sources</a> post for details.</p>

<p>Your configuration in the <code class="language-plaintext highlighter-rouge">serve.json</code> file should look like that. You can modify settings to reflect your configuration (list title, user profile property name, email, and copyright statement):</p>

<figure class="highlight"><pre><code class="language-json" data-lang="json"><span class="nl">"default"</span><span class="p">:</span><span class="w"> </span><span class="p">{</span><span class="w">
  </span><span class="nl">"pageUrl"</span><span class="p">:</span><span class="w"> </span><span class="s2">"https://dmitryrogozhny.sharepoint.com/sites/Test2"</span><span class="p">,</span><span class="w">
  </span><span class="nl">"customActions"</span><span class="p">:</span><span class="w"> </span><span class="p">{</span><span class="w">
    </span><span class="nl">"57e0a101-017b-4b4f-8f06-c0d29cd53092"</span><span class="p">:</span><span class="w"> </span><span class="p">{</span><span class="w">
      </span><span class="nl">"location"</span><span class="p">:</span><span class="w"> </span><span class="s2">"ClientSideExtension.ApplicationCustomizer"</span><span class="p">,</span><span class="w">
      </span><span class="nl">"properties"</span><span class="p">:</span><span class="w"> </span><span class="p">{</span><span class="w">
        </span><span class="nl">"linksListTitle"</span><span class="p">:</span><span class="w"> </span><span class="s2">"PnP-PortalFooter-Links"</span><span class="p">,</span><span class="w">
        </span><span class="nl">"copyright"</span><span class="p">:</span><span class="w"> </span><span class="s2">"Ⓒ Copyright Contoso, 2019-2020"</span><span class="p">,</span><span class="w">
        </span><span class="nl">"support"</span><span class="p">:</span><span class="w"> </span><span class="s2">"support@contoso.com"</span><span class="p">,</span><span class="w">
        </span><span class="nl">"personalItemsStorageProperty"</span><span class="p">:</span><span class="w"> </span><span class="s2">"PnP-CollabFooter-MyLinks"</span><span class="w">
      </span><span class="p">}</span><span class="w">
    </span><span class="p">}</span><span class="w">
  </span><span class="p">}</span><span class="w">
</span><span class="p">}</span></code></pre></figure>

<p>Now, run the <code class="language-plaintext highlighter-rouge">gulp serve</code> command to start the solution. A browser page will open with your test site and you’ll be asked to load debug scripts:
<img src="/assets/2019/moving-footer-from-sp-starter-kit-debug-scripts.jpg" alt="Load debug scripts" /></p>

<p>Select “Load debug sctipts” and the page will load with the footer available at the bottom.</p>

<h2 id="possible-issues">Possible issues</h2>
<p>There are two possible issues you may encounter at this stage.</p>

<h3 id="issue-1-broken-layout">Issue 1: Broken layout</h3>
<p>Depending on your SharePoint Online environment, you may see the broken layout for the footer. Everything will be displayed in one column on the left:
<img src="/assets/2019/moving-footer-from-sp-starter-kit-footer-preview-broken.gif" alt="Broken footer in action" /></p>

<h3 id="issue-2-personal-links-dialog-does-not-open">Issue 2: Personal links dialog does not open</h3>
<p>If you’ll expand the footer and select the “Edit” in the top right, the dialog for editing user’s personal links will appear and disappear right away.
<img src="/assets/2019/moving-footer-from-sp-starter-kit-footer-broken-personal.gif" alt="Broken personal links" /></p>

<p>Next time we’ll look at reasons for that issues and we’re going to fix them.</p>]]></content><author><name>Dzmitry Rahozhny (Dmitry Rogozhny)</name></author><category term="sharepoint" /><category term="spfx" /><category term="pnp" /><summary type="html"><![CDATA[This time we will move the source code for the footer from the SharePoint Starter Kit into a new project.]]></summary><media:thumbnail xmlns:media="http://search.yahoo.com/mrss/" url="https://dmitryrogozhny.com/assets/2019/moving-footer-from-sp-starter-kit-3-hero.jpg" /><media:content medium="image" url="https://dmitryrogozhny.com/assets/2019/moving-footer-from-sp-starter-kit-3-hero.jpg" xmlns:media="http://search.yahoo.com/mrss/" /></entry><entry><title type="html">Moving Footer from SharePoint Starter Kit. Part 2: Data Sources</title><link href="https://dmitryrogozhny.com/blog/moving-footer-from-sharepoint-starter-kit-2-create-data-sources" rel="alternate" type="text/html" title="Moving Footer from SharePoint Starter Kit. Part 2: Data Sources" /><published>2019-11-28T12:00:00+00:00</published><updated>2019-11-28T12:00:00+00:00</updated><id>https://dmitryrogozhny.com/blog/moving-footer-from-sharepoint-starter-kit-2-create-data-sources</id><content type="html" xml:base="https://dmitryrogozhny.com/blog/moving-footer-from-sharepoint-starter-kit-2-create-data-sources"><![CDATA[<aside>
  <p><strong>Posts in the series</strong>:</p>
  <ol>
    <li><a href="/blog/moving-footer-from-sharepoint-starter-kit-1-footer-overview">Portal footer overview</a></li>
    <li>Create data sources (<em>this post</em>)</li>
    <li><a href="/blog/moving-footer-from-sharepoint-starter-kit-3-new-project">Create new SPFx project</a></li>
    <li><a href="/blog/moving-footer-from-sharepoint-starter-kit-to-4-fix-issues">Fix issues</a></li>
    <li><a href="/blog/moving-footer-from-sharepoint-starter-kit-to-5-deploy-and-add-to-site">Deploy and add to a site</a></li>
    <li><a href="/blog/moving-collab-footer-from-sharepoint-starter-kit">Bonus: Moving Collaboration Footer</a></li>
  </ol>
</aside>

<p>This time we will create a SharePoint list that will store company-wide links for the portal footer. Also we will create a user profile property that will store users’ personal links.</p>

<p>Finally, we will create a test site for the footer.</p>

<h2 id="create-sharepoint-list-for-links">Create SharePoint list for links</h2>

<p>Let’s start with a list for company-wide links.</p>

<p>The footer expects a list of links to have a specific set of fields. It tries to get the list from the hub site. If no hub site is available, the list is retrieved from the current site.</p>

<p>We can create this list manually or use the PnP provisioning. I’ll show the latter approach.</p>

<p>You can get the <a href="https://github.com/dmitryrogozhny/sharepoint-lab/blob/master/footer/portal-footer/provisioning/portal-footer-links.xml">portal-footer/provisioning/portal-footer-links.xml</a> PnP provisioning template for the list in the GitHub repository. This template has been extracted from the <a href="https://github.com/SharePoint/sp-starter-kit/blob/master/provisioning/starterkit.xml">starterkit.xml</a> PnP provisioning template of the SharePoint Starter kit.</p>

<p>You need to use the PnP PowerShell to apply the template (check the <a href="https://github.com/SharePoint/sp-starter-kit#getting-started">Getting started</a> section in the Starter Kit to learn more about PnP PowerShell).</p>

<p>To create a links list you need to connect to your site and apply the provisioning template:</p>

<figure class="highlight"><pre><code class="language-powershell" data-lang="powershell"><span class="n">Connect-PnPOnline</span><span class="w"> </span><span class="nx">https://YOURDOMAIN.sharepoint.com/sites/YOURSITE</span><span class="w">
</span><span class="n">Apply-PnPProvisioningTemplate</span><span class="w"> </span><span class="nt">-Path</span><span class="w"> </span><span class="o">.</span><span class="nx">/portal-footer-links.xml</span></code></pre></figure>

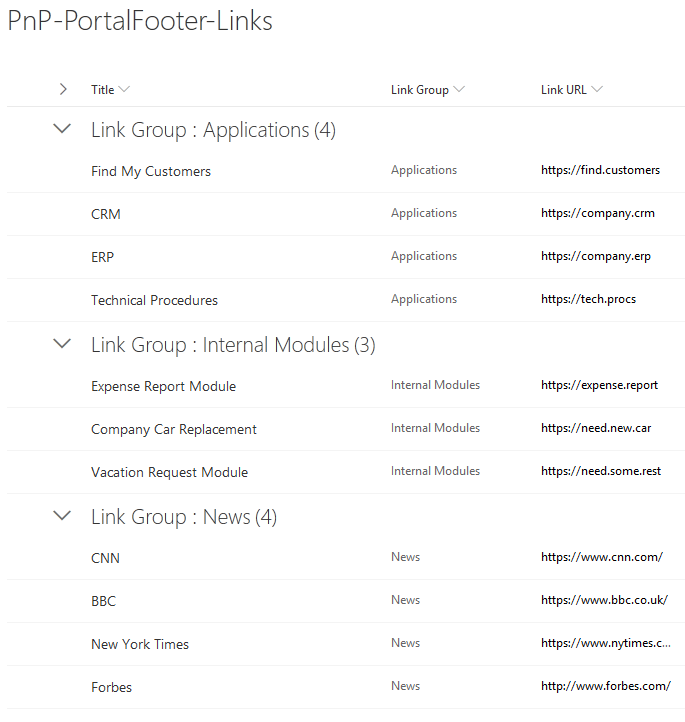
<p>The provisioning template will create the <code class="language-plaintext highlighter-rouge">PnP-PortalFooter-Links</code> list with demo links:
<img src="/assets/2019/moving-footer-from-sp-starter-kit-links-list.jpg" alt="Portal footer links" /></p>

<p><strong>Note</strong>: you can change the list name or modify the template to include links you want.</p>

<h2 id="create-user-profile-property">Create User Profile property</h2>

<p>The process is described in the <a href="https://github.com/SharePoint/sp-starter-kit/blob/master/documentation/tenant-settings.md#create-a-custom-property-in-the-user-profile-service">Create a Custom Property in the User Profile Service</a> section in the Starter Kit guide.</p>

<p>The only thing to consider is that an access point for the user profiles page has been changed in the SharePoint admin center. You can now find it in the SharePoint admin center in More features → User profiles:
<img src="/assets/2019/moving-footer-from-sp-starter-kit-user-profile.jpg" alt="User profile page" /></p>

<p><strong>Note</strong>: you can use any name you like for the property. We will use the created property name later when adding the footer to a site.</p>

<h2 id="create-test-site">Create test site</h2>

<p>Now we can create a new site that we’ll use for testing purposes. You can use any modern site template you want for it. Once the site is created, apply the PnP provisioning template to it to create a list of links for the footer. We will use this test site later.</p>

<p>Next time we will create a new project and move the source code for the footer in it.</p>]]></content><author><name>Dzmitry Rahozhny (Dmitry Rogozhny)</name></author><category term="sharepoint" /><category term="spfx" /><category term="pnp" /><summary type="html"><![CDATA[This time we will create a SharePoint list that will store company-wide links for the portal footer. Also we will create a user profile property that will store users' personal links. Finally, we will create a test site for the footer.]]></summary><media:thumbnail xmlns:media="http://search.yahoo.com/mrss/" url="https://dmitryrogozhny.com/assets/2019/moving-footer-from-sp-starter-kit-2-hero.jpg" /><media:content medium="image" url="https://dmitryrogozhny.com/assets/2019/moving-footer-from-sp-starter-kit-2-hero.jpg" xmlns:media="http://search.yahoo.com/mrss/" /></entry><entry><title type="html">Moving Footer from SharePoint Starter Kit. Part 1: Footer Overview</title><link href="https://dmitryrogozhny.com/blog/moving-footer-from-sharepoint-starter-kit-1-footer-overview" rel="alternate" type="text/html" title="Moving Footer from SharePoint Starter Kit. Part 1: Footer Overview" /><published>2019-11-27T12:00:00+00:00</published><updated>2019-11-27T12:00:00+00:00</updated><id>https://dmitryrogozhny.com/blog/moving-footer-from-sharepoint-starter-kit-1-footer-overview</id><content type="html" xml:base="https://dmitryrogozhny.com/blog/moving-footer-from-sharepoint-starter-kit-1-footer-overview"><![CDATA[<aside>
  <p><strong>Posts in the series</strong>:</p>
  <ol>
    <li>Portal footer overview (<em>this post</em>)</li>
    <li><a href="/blog/moving-footer-from-sharepoint-starter-kit-2-create-data-sources">Create data sources</a></li>
    <li><a href="/blog/moving-footer-from-sharepoint-starter-kit-3-new-project">Create new SPFx project</a></li>
    <li><a href="/blog/moving-footer-from-sharepoint-starter-kit-to-4-fix-issues">Fix issues</a></li>
    <li><a href="/blog/moving-footer-from-sharepoint-starter-kit-to-5-deploy-and-add-to-site">Deploy and add to a site</a></li>
    <li><a href="/blog/moving-collab-footer-from-sharepoint-starter-kit">Bonus: Moving Collaboration Footer</a></li>
  </ol>
</aside>

<p>I will show how to move the Portal Footer from the <a href="https://github.com/SharePoint/sp-starter-kit">SharePoint Starter Kit</a> into a separate project.
<img src="/assets/2019/moving-footer-from-sp-starter-kit-footer-preview.jpg" alt="Footer preview" /></p>

<p>You can get the source code for the final solution in the <a href="https://github.com/dmitryrogozhny/sharepoint-lab/tree/master/footer/portal-footer">portal-footer</a> repository.</p>

<p>The goal is to get a package that contains only the portal footer. This way we will not deploy components we won’t use and we won’t need to support them. This gives a smaller package size, faster building and deployment times. And the footer can be customized to your requirements.</p>

<p>In the same way, you can move other SharePoint Starter Kit components.</p>

<h2 id="sharepoint-starter-kit-overview">SharePoint Starter Kit overview</h2>
<p><a href="https://github.com/SharePoint/sp-starter-kit">SharePoint Starter Kit</a> is an open-source project from the SharePoint PnP team. It provides web parts and extensions that you can use as an example for your intranet customizations.</p>

<p><img src="/assets/2019/moving-footer-from-sp-starter-kit-sp-kit-preview.jpg" alt="SharePoint Starter Kit" /></p>

<p>The SharePoint Starter Kit project contains 17 web parts, 7 extensions, and additional deployment scripts. The source code is available in the <a href="https://github.com/SharePoint/sp-starter-kit">sp-starter-kit</a> GitHub repository.</p>

<p>You also can provision the kit using the <a href="https://provisioning.sharepointpnp.com/">SharePoint provisioning service</a> (I did an <a href="https://www.youtube.com/watch?v=BmzAyWWoY5s&amp;list=PLNx4CZSyPNnvrAlLo6OJGG5kmcE3LRs0s&amp;index=3">overview of the service</a>).</p>

<h2 id="portal-footer-overview">Portal Footer overview</h2>
<p>Here’s the <a href="https://github.com/SharePoint/sp-starter-kit/blob/master/documentation/components/ext-portal-footer.md">footer</a> that we’re going to extract to a separate project:
<img src="/assets/2019/moving-footer-from-sp-starter-kit-footer-preview.gif" alt="Footer in action " /></p>

<p>The footer provides a support email address, copyright statement, and a list of links. In addition to company-wide links, users can configure personal links that will be available only to them.</p>

<p>Company-wide links are stored in a SharePoint list. Personal links are stored in a user profile property.</p>

<p>Next time we will create data sources for the footer. Stay tuned!</p>]]></content><author><name>Dzmitry Rahozhny (Dmitry Rogozhny)</name></author><category term="sharepoint" /><category term="spfx" /><category term="pnp" /><summary type="html"><![CDATA[I will show how to move the Portal Footer from the SharePoint Starter Kit into a separate project. The goal is to get a package that contains only the portal footer. This way we will not deploy components we won't use and we won't need to support them. This gives a smaller package size, faster building and deployment times. And the footer can be customized to your requirements.]]></summary><media:thumbnail xmlns:media="http://search.yahoo.com/mrss/" url="https://dmitryrogozhny.com/assets/2019/moving-footer-from-sp-starter-kit-1-hero.jpg" /><media:content medium="image" url="https://dmitryrogozhny.com/assets/2019/moving-footer-from-sp-starter-kit-1-hero.jpg" xmlns:media="http://search.yahoo.com/mrss/" /></entry><entry><title type="html">Do Not Rely on SharePoint When Using Office UI Fabric</title><link href="https://dmitryrogozhny.com/blog/do-not-rely-on-sharepoint-when-using-office-ui-fabric" rel="alternate" type="text/html" title="Do Not Rely on SharePoint When Using Office UI Fabric" /><published>2019-11-26T12:00:00+00:00</published><updated>2019-11-26T12:00:00+00:00</updated><id>https://dmitryrogozhny.com/blog/do-not-rely-on-sharepoint-when-using-office-ui-fabric</id><content type="html" xml:base="https://dmitryrogozhny.com/blog/do-not-rely-on-sharepoint-when-using-office-ui-fabric"><![CDATA[<p>A quick note on a default availability of Office UI Fabric CSS in SharePoint Online: <strong>it is not consistent and it is not documented properly</strong>.</p>

<p>You should not rely on any current behavior of your SharePoint Online environment. It may change in the future without any notice.</p>

<p>The problem with SharePoint Online is that your code <strong>may work properly</strong> when you’re using global Office UI Fabric CSS classes without loading them. Or it <strong>may NOT work</strong>.</p>

<p>It depends on whether your current SharePoint Online environment loads Office UI Fabric CSS styles. This behavior changes from one environment to another, and it also changes with time.</p>

<p>I’ve already written about the <a href="/blog/using-office-ui-fabric-in-spfx">problem with global CSS classes</a> from Office UI Fabric when using them directly in SharePoint Framework solutions. The short version is to not use global Office UI Fabric CSS classes in your markup and use SASS mixins instead.</p>

<p>Let’s consider an example React component, that should render two <code class="language-plaintext highlighter-rouge">divs</code> on a single row using Office UI Fabric layout classes (e.g. “ms-Grid”, “ms-Grid-col”, “ms-lg4”):</p>

<figure class="highlight"><pre><code class="language-bash" data-lang="bash"><span class="k">return</span> <span class="o">(</span>
&lt;div <span class="nv">className</span><span class="o">={</span>styles.helloWorld<span class="o">}&gt;</span>
  &lt;div <span class="nv">className</span><span class="o">=</span><span class="s2">"ms-Grid"</span><span class="o">&gt;</span>
    &lt;div <span class="nv">className</span><span class="o">=</span><span class="s2">"ms-Grid-row"</span><span class="o">&gt;</span>
      &lt;div <span class="nv">className</span><span class="o">=</span><span class="s2">"ms-Grid-col ms-lg4"</span><span class="o">&gt;</span>
        &lt;div <span class="nv">className</span><span class="o">={</span>styles.demoBlock<span class="o">}&gt;</span>A&lt;/div&gt;
      &lt;/div&gt;
      &lt;div <span class="nv">className</span><span class="o">=</span><span class="s2">"ms-Grid-col ms-lg8"</span><span class="o">&gt;</span>
        &lt;div <span class="nv">className</span><span class="o">={</span>styles.demoBlock<span class="o">}&gt;</span>B&lt;/div&gt;
      &lt;/div&gt;
    &lt;/div&gt;
  &lt;/div&gt;
&lt;/div&gt;
<span class="o">)</span><span class="p">;</span></code></pre></figure>

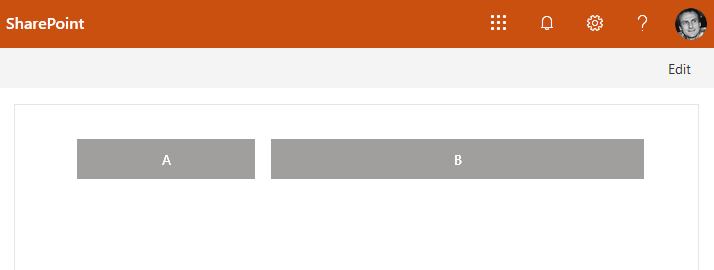
<p>Here’s how the web part renders in a SharePoint Online workbench (i.e. available with /_layouts/15/workbench.aspx):
<img src="/assets/2019/do-not-rely-on-sharepoint-site.jpg" alt="SharePoint Online workbench" /></p>

<p>The layout works fine as SharePoint Online loads Office UI Fabric CSS under the hood. But this beharivor may change without a notice and relying on this may break your solution in the future!</p>

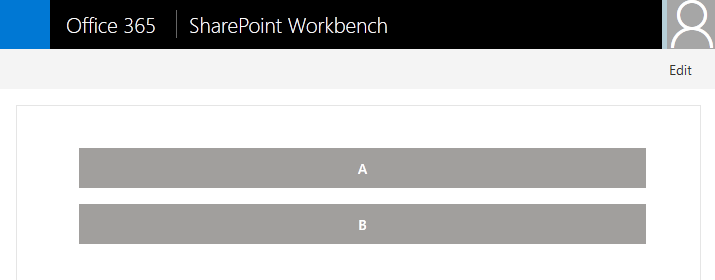
<p>Here’s how it looks like in a local workbench:
<img src="/assets/2019/do-not-rely-on-sharepoint-local.jpg" alt="local workbench" /></p>

<p>The layout is broken — divs are displayed in two separate rows one under another. That happens because the local workbench does not load Office UI Fabric classes, so the browser knows nothing about those.</p>

<h3 id="the-right-way">The right way</h3>
<p>The right way to use Office UI Fabric classes is to use mixins:</p>

<figure class="highlight"><pre><code class="language-bash" data-lang="bash"><span class="k">return</span> <span class="o">(</span>
&lt;div <span class="nv">className</span><span class="o">={</span>styles.helloWorld<span class="o">}&gt;</span>
  &lt;div <span class="nv">className</span><span class="o">={</span>styles.grid<span class="o">}&gt;</span>
    &lt;div <span class="nv">className</span><span class="o">={</span>styles.gridRow<span class="o">}&gt;</span>
    &lt;div <span class="nv">className</span><span class="o">={</span>styles.smallColumn<span class="o">}&gt;</span>
      &lt;div <span class="nv">className</span><span class="o">={</span>styles.demoBlock<span class="o">}&gt;</span>A&lt;/div&gt;
    &lt;/div&gt;
    &lt;div <span class="nv">className</span><span class="o">={</span>styles.largeColumn<span class="o">}&gt;</span>
      &lt;div <span class="nv">className</span><span class="o">={</span>styles.demoBlock<span class="o">}&gt;</span>B&lt;/div&gt;
    &lt;/div&gt;
    &lt;/div&gt;
  &lt;/div&gt;
&lt;/div&gt;
<span class="o">)</span><span class="p">;</span></code></pre></figure>

<p>The CSS styles would look like that:</p>

<figure class="highlight"><pre><code class="language-less" data-lang="less">@import '~office-ui-fabric-react/dist/sass/References.scss';

.helloWorld {
  .grid {
    @include ms-Grid;
  }

  .gridRow {
    @include ms-Grid-row;
  }

  .smallColumn {
    @include ms-Grid-col;
    @include ms-lg4;
  }

  .largeColumn {
    @include ms-Grid-col;
    @include ms-lg8;
  }
}</code></pre></figure>

<p>This is the only correct way to do styling with Office UI Fabric. At least until the SharePoint Online behavior is not properly documented.</p>]]></content><author><name>Dzmitry Rahozhny (Dmitry Rogozhny)</name></author><category term="sharepoint" /><category term="spfx" /><category term="office ui" /><summary type="html"><![CDATA[A quick note on a default availability of Office UI Fabric CSS in SharePoint Online: it is not consistent and it is not documented properly.]]></summary><media:thumbnail xmlns:media="http://search.yahoo.com/mrss/" url="https://dmitryrogozhny.com/assets/2019/do-not-rely-on-sharepoint-hero.jpg" /><media:content medium="image" url="https://dmitryrogozhny.com/assets/2019/do-not-rely-on-sharepoint-hero.jpg" xmlns:media="http://search.yahoo.com/mrss/" /></entry><entry><title type="html">Running Telegram Bot with Node.js and Azure Functions</title><link href="https://dmitryrogozhny.com/blog/running-nodejs-telegram-bot-with-azure-functions" rel="alternate" type="text/html" title="Running Telegram Bot with Node.js and Azure Functions" /><published>2019-11-25T12:00:00+00:00</published><updated>2019-11-25T12:00:00+00:00</updated><id>https://dmitryrogozhny.com/blog/running-nodejs-telegram-bot-with-azure-functions</id><content type="html" xml:base="https://dmitryrogozhny.com/blog/running-nodejs-telegram-bot-with-azure-functions"><![CDATA[<p>Here’s a quick example of how to implement a Telegram bot with Node.js and deploy it with Azure Functions.</p>

<p>I’m going to implement a <a href="https://telegram.me/WhereToFlatWhiteBot">@WhereToFlatWhiteBot</a> bot that will advise on places with a great flat white around the world:
<img src="/assets/2019/running-nodejs-telegram-bot-with-azure-functions-preview.gif" alt="bot preview" /></p>

<p>This bot shows a set of buttons for available cities. When a city is selected, the bot will show coffee places and some additional information.</p>

<p>The source code is available in the <a href="https://github.com/dmitryrogozhny/where-to-flat-white">where-to-flat-white</a> GitHub repository.</p>

<p>We can split the implementation into three steps:</p>
<ol>
  <li>Register new bot in Telegram with the <a href="https://telegram.me/BotFather">@BotFather</a> account.</li>
  <li>Create new Azure Function project.</li>
  <li>Implement the bot’s logic.</li>
</ol>

<p>In this post, I’ll concentrate on the bot’s source code. I will briefly mention the bot registration part and the Azure function creation process.</p>

<h3 id="1-register-new-bot-with-botfather">1. Register new bot with @BotFather</h3>

<p>Here’s the <a href="https://core.telegram.org/bots#3-how-do-i-create-a-bot">official guide</a> on how to register a new bot. Once registered, you’ll get a toke for your bot that will look something like that: <code class="language-plaintext highlighter-rouge">'1030725119:AAEnqsUCI5a-XxNVBffRXwWM5LmBAuMBF1Y'</code>. Keep it safe, you will use that token later.</p>

<p>Additionally, you can specify a title, description, and image for your bot.</p>

<p>For my demo, I’ve created the <a href="https://telegram.me/WhereToFlatWhiteBot">@WhereToFlatWhiteBot</a> bot.</p>

<h3 id="2-create-new-azure-function-project">2. Create new Azure Function project</h3>

<p>Here’s the guide on <a href="https://docs.microsoft.com/en-us/azure/azure-functions/functions-create-first-function-vs-code">how to create new Azure Function project</a> in VS Code.</p>

<p>For my project, I’ve additionally added two application settings: <code class="language-plaintext highlighter-rouge">"TELEGRAM_BOT_TOKEN"</code> that will store the bot token and <code class="language-plaintext highlighter-rouge">"WEBHOOK_ADDRESS"</code> that will store the Url of the created function. I’ll use them in the code to initialize my bot.</p>

<h3 id="3-implement-the-bot">3. Implement the bot</h3>

<p>The source code for the bot is in the <a href="https://github.com/dmitryrogozhny/where-to-flat-white/blob/master/WhereToFlatwhiteBot/index.js">index.js</a>.</p>

<p>The data for cities comes from markdown files that are deployed with the function. For every city, there is a markdown file with the same name.</p>

<p>I’ve used the <a href="https://telegraf.js.org">telegraf.js</a> library for my bot. It is a modern Telegram bot framework for Node.js. This framework makes it easy to work with Telegram Bot API.</p>

<p>I’ve added telegraf.js to my project with npm install:</p>

<figure class="highlight"><pre><code class="language-bash" data-lang="bash">npm <span class="nb">install </span>telegraf <span class="nt">--save</span></code></pre></figure>

<p>After that, we can initialize the bot and configure it:</p>

<figure class="highlight"><pre><code class="language-javascript" data-lang="javascript"><span class="kd">const</span> <span class="nx">bot</span> <span class="o">=</span> <span class="k">new</span> <span class="nx">Telegraf</span><span class="p">(</span><span class="nx">process</span><span class="p">.</span><span class="nx">env</span><span class="p">[</span><span class="dl">"</span><span class="s2">TELEGRAM_BOT_TOKEN</span><span class="dl">"</span><span class="p">],</span> <span class="p">{</span> <span class="na">webhookReply</span><span class="p">:</span> <span class="kc">true</span> <span class="p">});</span>
<span class="nx">bot</span><span class="p">.</span><span class="nx">telegram</span><span class="p">.</span><span class="nx">setWebhook</span><span class="p">(</span><span class="nx">process</span><span class="p">.</span><span class="nx">env</span><span class="p">[</span><span class="dl">"</span><span class="s2">WEBHOOK_ADDRESS</span><span class="dl">"</span><span class="p">]);</span>

<span class="nx">bot</span><span class="p">.</span><span class="nx">on</span><span class="p">(</span><span class="dl">'</span><span class="s1">callback_query</span><span class="dl">'</span><span class="p">,</span> <span class="nx">getCity</span><span class="p">);</span>
<span class="nx">bot</span><span class="p">.</span><span class="nx">on</span><span class="p">(</span><span class="dl">'</span><span class="s1">sticker</span><span class="dl">'</span><span class="p">,</span> <span class="nx">welcomeMessage</span><span class="p">);</span>
<span class="nx">bot</span><span class="p">.</span><span class="nx">hears</span><span class="p">(</span><span class="sr">/^/</span><span class="p">,</span> <span class="nx">welcomeMessage</span><span class="p">);</span>
<span class="nx">bot</span><span class="p">.</span><span class="k">catch</span><span class="p">((</span><span class="nx">err</span><span class="p">,</span> <span class="nx">ctx</span><span class="p">)</span> <span class="o">=&gt;</span> <span class="p">{</span> <span class="nx">console</span><span class="p">.</span><span class="nx">log</span><span class="p">(</span><span class="s2">`Error for </span><span class="p">${</span><span class="nx">ctx</span><span class="p">.</span><span class="nx">updateType</span><span class="p">}</span><span class="s2">`</span><span class="p">,</span> <span class="nx">err</span><span class="p">);</span> <span class="p">});</span></code></pre></figure>

<p>I create a new bot and pass the token to it. Also I specify that the Telegram should send requests to my Azure Function every time the bot is requested (by setting web hooks address).</p>

<p>After that, I configure the bot to listen for incoming messages and display a welcome message (processed by the <code class="language-plaintext highlighter-rouge">"welcomeMessage"</code> function). When a user selects a button for a city, the <code class="language-plaintext highlighter-rouge">"getCity"</code> function should be called. It will return available information for the selected city. The <code class="language-plaintext highlighter-rouge">"bot.catch"</code> will fire in case of errors.</p>

<p>This is all we need for the bot logic.</p>

<p>As for the Azure Function, every time a request hits it, it will take the request body and run the <code class="language-plaintext highlighter-rouge">"bot.handleUpdate"</code> function to process the Telegram request.</p>

<h3 id="deploy-and-run">Deploy and run</h3>

<p>Finally, we can deploy the function and access the bot. It will greet us with the welcome message and will return information about great coffee.</p>]]></content><author><name>Dzmitry Rahozhny (Dmitry Rogozhny)</name></author><category term="javascript" /><category term="node" /><category term="telegram" /><summary type="html"><![CDATA[Here’s a quick example of how to implement a Telegram bot with Node.js and deploy it with Azure Functions.]]></summary><media:thumbnail xmlns:media="http://search.yahoo.com/mrss/" url="https://dmitryrogozhny.com/assets/2019/running-nodejs-telegram-bot-with-azure-functions-hero.jpg" /><media:content medium="image" url="https://dmitryrogozhny.com/assets/2019/running-nodejs-telegram-bot-with-azure-functions-hero.jpg" xmlns:media="http://search.yahoo.com/mrss/" /></entry></feed>