Table of Contents Web Part
The Table of Contents web part generates a navigation menu using H1, H2, and H3 headings available on SharePoint Online pages. It is useful for large pages as it allows to quickly navigate to a specific section.

In this post, I’ll tell how the web part has been implemented. The source code for this SharePoint Framework project is available in the table-of-contents repository on GitHub.
I recently wrote the Anchors in Modern SharePoint Pages (Much More Than You Wanted to Know) post on how SharePoint Online generates anchor links in modern pages. I’ll be using this information to implement the Table of Contents web part.
Overview
First of all, you add the Table of Contents web part to a page. You can use a vertical section layout to place the web part or use the one-third right layout: in a center (wide) column you can place a Text web part, and a Table of Contents web part in a narrow right column. The Table of Contents web part will collect headings and will generate a navigation menu.
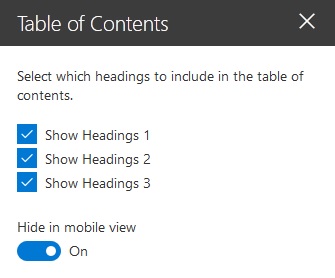
In the web part settings, you can specify which headings to include in a menu. Also, there is an option to hide the web part on small screens. It is useful as on small screens one-third right layout would collapse into a single column and the Table of Contents web part will be under the text (which is kinda useless).
Implementation details
Source code overview
The source code for this SharePoint Framework project is available in the table-of-contents repository on GitHub. The web part is defined in the TableOfContentsWebPart.ts file.
The TableOfContents.tsx React component is responsible for retrieving headings and generating a menu.
Getting headings
All headings on a page got retrieved with the document.querySelectorAll function. The selector to use in a query is returned by the getQuerySelector function and depends on the web part properties. If all headings should be selected (i.e. first level, second level, and third level headings are selected in web part properties), the selector would be h2 h3 h4.
After the query, the returned headings got filtered. We remove headings with empty text and headings that are inside <aside> tag:
const headers = this.getHtmlElements(querySelector).filter(this.filterEmpty).filter(this.filterAside);This gives us a list of headings that will be included in a navigation menu.
Important: at this stage, headings will not have valid ids, so the web part cannot generate anchor links for them. This is because SharePoint will add ids to headings once all the Text web parts got rendered. More details about this in the Anchors in Modern SharePoint Pages (Much More Than You Wanted to Know) post.
Creating a tree of links
Now we need to convert a list of headings into a tree that will be used by a component during rendering. This is done in the getLinks function.
We take all headings one by one and define where to place the heading: in a root (in case of H2 headings), as a child of a previous heading (e.g. for H3 heading if a previous one was H2), or somewhere else (e.g. if a previous one was H4 and the current one is H3 — we need to go up in the hierarchy to find an H2 heading to add this H3 to).
As the outcome of this function, we get a hierarchy of links. Every link contains a reference to an Html element of a corresponding heading.
For example, for the following headings list:
- Heading 2
- Heading 3
- Heading 3
- Heading 4
- Heading 2
we will get the following hierarchy:
- Heading 2
- Heading 3
- Heading 3
- Heading 4
- Heading 2
Rendering links
Now we need to render links.
This is done by renderLinks function. We take a links hierarchy and render a markup:
<ul>
  // for every link render <li> element with <a> tag
  <li>
    <a onclick={this.scrollToHeader(link.element)} href='#HEADING-ID'>HEADING-TEXT</a>
    // if the link has got child nodes, render nested <ul> here
  </li>
</ul>
Every link will have an onclik event handler that will scroll the page to a corresponding header using the Html reference to an element. The scrolling is done using the Element.scrollIntoView function.
Important: at this stage, there may be no ids for headings, so we won’t be able to generate anchor links. The menu will work though, as we’re using the reference to an Html element instead. The only problem is that links in a menu will not contain anchors, so if we’ll copy such a link, it will not contain #HEADING-ID at the end.
Forcing additional rendings
SharePoint will assign anchor links to headings once all the Text web parts got rendered on a page. In order to get these anchor links in the Table of Contents web part, we set a repetitive timeout with the setInterval in the componentDidMount function. On a timeout, we set an empty state for the component to force a rendering.
During re-rendering, the component retrieves headings once again and repeats all the rendering described above. If SharePoint assigned ids to headings by this time, we’ll get a valid navigation menu with all the anchor links specified.
As the list of headings stays the same (only ids of headings may change) re-rendering does not cause any blinking or other visual glitches.
At this moment, we’ve got a fully functional table of contents for a page: we can click on a link to navigate to a section and we can copy a link in a menu to use it somewhere else (share, open in new window).
To summarize: after the first rendering, we’ll get a correctly looking table of contents that we can click to navigate. The only drawback is that anchor links cannot be copied at this moment. Once SharePoint finishes assigning anchor links to headings, the table of content will contain all the correct links.
That’s it for the implementation details.