Moving Footer from SharePoint Starter Kit. Part 3: New Project
This time we will move the source code for the footer from the SharePoint Starter Kit into a new project.
Create new project
Let’s start by creating a new SharePoint Framework project.
Here’re the settings I’ve used creating a new project with yo @microsoft/sharepoint:
- What is your solution name? portal-footer
- Where do you want to place the files? Create a subfolder with solution name
- Do you want to allow the tenant admin the choice of being able to deploy the solution to all sites immediately without running any feature deployment or adding apps in sites? Yes
- Will the components in the solution require permissions to access web APIs that are unique and not shared with other components in the tenant? No
- Which type of client-side component to create? Extension
- Which type of client-side extension to create? Application Customizer
- What is your Application Customizer name? PortalFooter
- What is your Application Customizer description? PortalFooter description
Note: I’ve selected to allow the tenant admin to be able to deploy the solution tenant-wide. This is not required but it makes it easier to deploy and manage.
The project generator will create a new project and will install additional packages. Once done, navigate to the project folder and execute gulp build to make sure that the generated project works fine.
Now it’s time to move the portal footer’s code into the project.
Get SharePoint Starter Kit code
We need to clone the source code of the SharePoint Starter Kit. You can do that by running:
git clone https://github.com/SharePoint/sp-starter-kit.gitThe source code for the footer is located in the sp-starter-kit/solution/src/extensions/portalFooter folder;
Copy Portal Footer code to new project
Now, copy all the files, except the manifest file PortalFooterApplicationCustomizer.manifest.json, from the SharePoint Starter kit sp-starter-kit/solution/src/extensions/portalFooter folder to the new project folder portal-footer/src/extensions/portalFooter.
Note: While copying, you’ll rewrite the application customizer file PortalFooterApplicationCustomizer.ts and localization files from the loc folder.
Note 2: It is important that you leave the original manifest file untouched. This way the footer in the new project will have a unique id that is different from the footer id from SharePoint Starter kit. This will allow to avoid possible collisions.
Copy additional files
At this stage, if you’ll try to build the project, you’ll get error messages about missing files.
This is because the portal footer uses some common code from the Starter Kit. We need to copy this code as well. In addition to the footer extension’s code you need to copy to the new project:
- From the
sp-starter-kit/solution/src/servicesfolder copySPUserProfileService.tsandSPUserProfileTypes.tsfiles to theportal-footer/src/servicesfolder. These files allow to work with the user profile service. - Copy the
sp-starter-kit/solution/src/commonfolder to theportal-footer/src/commonfolder. It containsmyLinkscomponent that allows to edit personal links.
For myLinks component to work properly, you need to add its resources file to the portal-footer/config/config.json file. Modify the localizedResources property to include the following:
"localizedResources": {
  "PortalFooterApplicationCustomizerStrings": "lib/extensions/portalFooter/loc/{locale}.js",
  "MyLinksStrings": "lib/common/myLinks/loc/{locale}.js"
}
Your src folder structure would look like that:
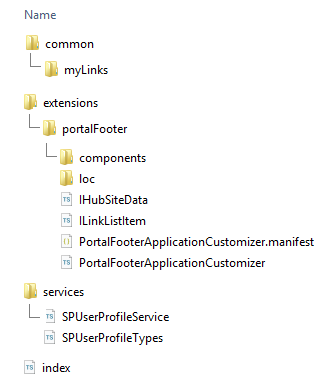
Now we’ve got all the source code we need.
Add missing npm packages
The portal footer uses @pnp/sp package to get SharePoint list items.
We need to add this package and its dependencies to our project by running:
npm install @pnp/sp @pnp/common @pnp/logging @pnp/odataFix paths to Office Fabric UI classes
The footer uses @microsoft/sp-office-ui-fabric-core package to reference Office UI Fabric styles.
This package is not available in the new project. We can either add it with npm install @microsoft/sp-office-ui-fabric-core or we can reference Office UI Fabric styles from the available "office-ui-fabric-react" package.
I will do the latter by replacing the “@import ‘~@microsoft/sp-office-ui-fabric-core/dist/sass/SPFabricCore.scss’;” with “@import ‘~office-ui-fabric-react/dist/sass/_References.scss’;” in all .scss files. With this approach, we won’t need to install an additional package.
Build and run the solution
Ok, we are ready to build the solution. Run gulp build to build the solution and this time there should be no errors.
To run the solution, there is one thing we still need to do.
Modify the portal-footer/config/serve.json file and in the “default” configuration section replace the “pageUrl” value “https://contoso.sharepoint.com/sites/mySite/SitePages/myPage.aspx” with your test site Url. If you don’t have a test site ready, refer to the Part 2: Data Sources post for details.
Your configuration in the serve.json file should look like that. You can modify settings to reflect your configuration (list title, user profile property name, email, and copyright statement):
"default": {
  "pageUrl": "https://dmitryrogozhny.sharepoint.com/sites/Test2",
  "customActions": {
    "57e0a101-017b-4b4f-8f06-c0d29cd53092": {
      "location": "ClientSideExtension.ApplicationCustomizer",
      "properties": {
        "linksListTitle": "PnP-PortalFooter-Links",
        "copyright": "Ⓒ Copyright Contoso, 2019-2020",
        "support": "[email protected]",
        "personalItemsStorageProperty": "PnP-CollabFooter-MyLinks"
      }
    }
  }
}
Now, run the gulp serve command to start the solution. A browser page will open with your test site and you’ll be asked to load debug scripts:

Select “Load debug sctipts” and the page will load with the footer available at the bottom.
Possible issues
There are two possible issues you may encounter at this stage.
Issue 1: Broken layout
Depending on your SharePoint Online environment, you may see the broken layout for the footer. Everything will be displayed in one column on the left:

Issue 2: Personal links dialog does not open
If you’ll expand the footer and select the “Edit” in the top right, the dialog for editing user’s personal links will appear and disappear right away.

Next time we’ll look at reasons for that issues and we’re going to fix them.